close

Gadgets

Do It Yourself

Remove Scratches from Glasses- Easy Fix

Remove Scratches from Glasses- Easy Fix

You may feel annoyed if there is a scratch on your lenses. No matter whether the scratch is minor or major – it can distract your concentration from doing any task. Scratches on lenses can make things hard to see. But these scratches are imminent. So, you need to think about how you can prevent your glasses from getting scratched. Here are few tips to remove scratches from glasses.

Best Ways to Avoid Scratching Your Glasses

Always Use Hard Cases: 

You should use hard cases to store your spectacles. Keep them always in a hard case when you don’t wear them. Thus, you can avoid the risk of breaking the frames of your glasses. Besides, it will minimize the risk of bending your glasses. You must not keep the specs facing down on your table. Don’t keep them in the bag, or the pocket. Also, you should not hang the specs from the shirt collar.

Try to Put on Your Specs Most of the Time:

To avoid scratching, you can try to wear the specs for most of the time. But what to do when you are not wearing them? You can use a chain around the stems. These can help the glasses to dangle from the neck. Thus, your lenses will only touch your soft shirt, and you will get rid of this issue.

Don’t Leave Your Specs Anywhere:

Most people leave their specs in their car. As a result, the hot temperature of the car can damage the coating of lenses. For example, it can damage both anti-reflective and scratch-resistant coating. That’s why you must not leave the glasses in your car. The damage can cause glass lenses to crack. Even, the extreme heat can wrap the shape of the lenses.

Use Microfiber Cloth:

You should clean the specs correctly. Use optometrist-approved lenses cleaning spray and microfiber cloth to keep the specs cleaned. Besides, you should clean your specs very carefully. Most importantly, don’t use any paper cloths for cleaning the surface of your specs. The microfiber cloths help to remove dust, debris, etc. But when the specs need deep cleaning, you should use lukewarm water. Use the water to rinse the debris, dust off from the glasses. Next, you need to use dish washing liquid and rub on the lenses. After applying the liquid, your job is to take a dry microfiber cloth and wipe the lenses.

Store the Specs Properly:

You should always use hard cases as we have said earlier. It will help to avoid the risk of having scratches on the glasses. However, if you don’t have any cases, then use microfiber bags. These also allow you to store your specs carefully. If you want to put off your specs at night, then you can use a glass stand. Keep the stand next to your bed and put the specs on it. Don’t leave your specs in the bathroom or on your dressing table. These kinds of carelessness can lead to having spots on the specs.

Handle with Care:

When you remove your specs, handle these carefully. Remove the specs with your both hands. After that, you need to hold it by the temples. Don’t hold the rims around the lenses. By following the procedure, you can protect the specs from extra dust and skin oils. In case you need to place them on a hard surface; you need to fold and place the specs by keeping the temple down. Placing them down in this way can protect the lenses from remaining towards the ceiling.

You must not use your finger or shirt to smudge a scratch on the specs. However, you can consult with the eye specialist for getting advice regarding how you can protect your specs from getting scratched.

Why Do Eye-Glasses Get Scratch Easily

Here, we have given a few reasons due to which eyeglasses get scratches.

Usually, lenses are not glasses. Nowadays, the glasses consist of sophisticated plastic. Besides, these kinds of materials are ideal for everyday use. Also, plastic offers more safety compared to the glasses. However, there will be less risk of having cracks on the surface than the glasses. Since the plastic ones get scratches easily.

Most of the time, dust, lint cling to the plastic material. If dirt or debris are accumulated on the specs and rub it on that time, it can cause scratches. That’s why those products that have gritty textures will not be able to solve this issue.

Many people think that they can use tissue and fabrics to clean their glasses. But these are much harsher than they think. You must not use a shirt, facial tissues, towels, or toilet paper because these can cause lint on the specs.

You should not use household cleaners because of their abrasive property. For example, Windex, a household cleaner, can strip the protective coating of lenses. Therefore, it can lead to damage to your specs.

Wearing Scratched Glasses- Issues

If you see that there are small scratches on it, then don’t worry. It won’t affect your vision too much. But if there remains major scratch, then you may face visual disturbances and headaches.

When Do You Need to Replace Your Specs? 

According to the doctors, if a person faces problems while performing their regular activities due to the visual distortion and things seem to be a blur, it’s time to change the old specs. Mainly these problems seem while driving.

Otherwise, if you are getting a headache or other visual disturbances, then you need to replace it as soon as possible.

Can You Get Benefited From An Eye Specialist If Your Specs Have Already Been Scratched? 

If you want to repair them, then no. It’s not possible. Even a minor scratch can’t be fixed with the help of a professional. You need to go for replacement in this case. And make sure that while choosing the new, you have asked the provider to add a scratch-resistant coating to the specs.

How to Remove Scratches from Glasses

Here, we have a few tips following how to get scratches out of glasses. Let’s check out.

We have already told you that you can get headache by using scratched specs. But it’s quite impossible to protect your glasses throughout the lifetime. By chance, it can fall from your hand. Or it may happen that you have kept the specs in your pocket without the case. It can also cause scratches on spec. Here we have given some tips that will let you know how to get scratches out of glasses.

Remove Scratches from Glasses Using Toothpaste:

Toothpaste is the most common and essential thing of daily life that every person has in his/her home. Therefore, you can effortlessly  remove scratches from glasses by using toothpaste. In this case, you first need to take a little non-abrasive toothpaste. Put the toothpaste on the cotton wool, and then you need to rub it circularly. Do this process for a few seconds. After that, you need to rinse the specs in cold water. Then pat it gently with the help of a dry and clean cloth. In case you see that the scratches are remaining, repeat the process.

It is a quick, inexpensive way that is effective for minor scratches. But for deeper scratches, you have to repeat the method a few times. RDA stands for Radioactive Dentin Abrasiveness. It measures the abrasiveness of any item.

A paste having below 70-80 is known as low abrasiveness. To follow this method, you don’t need to buy expensive toothpaste. Non-abrasive and non-gel ones can easily do your job. If you are looking for low abrasive toothpaste, try to ignore the advanced products. For example, you need to avoid whitening or plaque removal.

However, there are a few kinds of toothpaste that you can use:- Arm & Hammer Dental Care Sensitive (48 RDA), Weleda Children’s Tooth Gel (45 RDA), Rembrandt Mint (63 RDA), Colgate 2-in-1 Fresh Mint (70 RDA), Colgate Sensitive Max Strength(83 RDA), Colgate Total (70 RDA), Colgate Regular (68 RDA), and Sensodyne (79 RDA).

How Remove Scratches from Glasses Using Baking Soda

Sometimes, you are confused to determine whether the toothpaste is abrasive or not. At that moment, what you can do is avoid those. Thus, you can minimize the risk of damaging your specs. Using Baking soda, you can remove scratches from glasses easily. It is a useful and cost-effective solution that you can find in your kitchen easily.

Usually, baking soda that comes with an abrasion rating of 7 RDA. It is very safe for your specs. So, you can use it without any tension. If you want to remove the scratches by following the procedure, you need to take one spoon of baking soda. After that, you need to mix it with water. Then, what you need to do is stir it until it forms a glue-like thick paste.

Now, you have to apply the paste to the lenses using a soft cotton cloth or ball. Make sure that you are rubbing the paste in a circular motion. You need to do this process for around thirty seconds continuously.

After doing that, you need to wipe the soda away. You need to use a clean, damp cloth in this case. Then, keep the lenses to get dry. If you still see scratches, repeat the method. For hard scratches, this way is time-saving and useful too.

How to Get Scratches Out of Glasses  Metal Polish

For plastic frames, you can go for another method. And that is you can use brass, silver or metal polish to remove the scratches. In this process, you need to select a low abrasive metal polish. Then, take a little amount of polish and apply it at every scratch portion. You need to rub this polish on the scratches for a few seconds with a soft cotton cloth.

Always remember that this process is time-consuming. It takes time while polishing out any item. When you clean the specs thoroughly, you can take a cotton bud, and then rub alcohol on it to give the specs a clean look. But this process is not applicable for lenses. It can damage the coatings. The drawbacks of this procedure are: This method is time-consuming and costly too.

Remove Scratches Using Car Cleaning Wax

These kinds of wax are used mainly for polishing vehicles. However, this is an excellent option for removing scratches from both plastic lenses and glasses. Usually, people prefer to use high brands like Turtle Wax or Meguiar’s. Here, we have elaborated how to use Car Cleaning Wax to remove scratches on specs. Let’s check out.

First, you need to wipe off the dust, debris properly from the glasses. Use a microfibre cleaning cloth to do it. After cleaning the glasses, start the process.

Then, you need to apply the vehicle wax on the scratched area with a soft cotton cloth. After that, you need to rub the wax in circular motions. You need to repeat the step if there is major scratch.

Next, your job is to rinse away the glasses using room temperature water.

Now, you have to dry the lenses. A clean, dry microfiber cloth can be beneficial in this case. Repeat the methods if still there remain scratches.

How to Get Scratches Out of Glasses Glass Etching Cream

For this process, you can use any glass etching cream that has hydrofluoric acid. First, you have to wear disposable gloves. These will help you to protect your hands. Then, you need to take a cotton swab. Then, apply a thick coat of this cream on the lenses’ surface.

You must not rub the cream on the lenses. After applying the thick layer of the cream, you need to wait for a while and allow this cream to sit for five minutes. Next, you need to rinse the glasses.

Lastly, you need to use a cotton cloth to wipe off the lenses. Then you will get to see that the cream is getting peeled off. But you should avoid this process for removing scratches from glass lenses. However, this method is a little bit risky and expensive too. In case you left the cream to settle for more than five minutes, it can damage the lenses.

It is basically a temporary quick-fix method. But if the scratches are deep and stubborn, this process is not going to be worked. Moreover, there remain huge possibilities of damaging the lenses. Besides, the harsh chemicals can damage the coatings.

Try a Scratch Filler Kit

Multiple scratch filler kits are available in the market that helps to repair scratches. Usually, these kits come with a glass polishing compound, clothes and tools. These can make your job done easily. Ensure that you have gone through the instructions carefully. If you don’t do it properly, then it can damage your lenses.

How to Avoid Scratching of Glasses

  • Never use paper towels, tissues, or shirts that you are wearing for smudging the lenses. Cleaning with these materials can cause minor scratches on the lenses. Always use soft cotton clothes, especially those that you get with the specs when you buy them.
  • Try to avoid cleaning your lenses and frames with those solutions that contain acetone. Acetone that is known as nail polish remover can damage both plastic and glass lenses. These kinds of products remain on the surface of lenses for an extended period and damage the lenses.
  • It is often advised to use and spread toothpaste over the lenses. Then, you need to rub the toothpaste to remove scratches. It can work sometimes. But you need to make sure that you are using non-gel and non-abrasive toothpaste. Besides, you need to check whether it is non-whitening or not.

What to Do:

  • Make sure that you have washed your hands properly. By doing so, you can ensure that you are not transferring germs to your specs.
  • You can use warm water to wash your scratched lenses. Then wipe the lenses with a microfiber cloth.

Frequently Asked Questions:

  • How to remove scratches from glasses?

Plenty of ways are there that you can follow to remove scratches from glasses:

  • Toothpaste
  • Scratch filler kits
  • Metal polish cleaner
  • Baking soda

But you should use these methods on minor scratches. However, in case your lenses have any deep cracks, then you should go to a professional.

  • How to remove scratches from prescription glasses?

For many years, most eyeglass wearers have used baking soda to solve this problem. You need to make a thick paste by mixing the baking soda with the water. After that,  apply it on the scratched area. Then take a soft cotton cloth and rub gently. In addition,  rinse the glasses in water and wait until the glasses get dried.

  • How to remove scratches from eyeglasses?

You can follow the toothpaste, baking soda, or metal polish method given above. You can try the car wax method to remove surface scratches. On the other hand, if you have plastic or polycarbonate lenses, then use glass etching cream. It will help you to remove the scratches effortlessly.

You can try the combination of vinegar and dry mustard also. In this case, you only need to make a paste of these two items. Then, take the paste and rub it on the scratches. After completing the method, make sure that you rinse the glasses correctly. It is because mustard can cause irritation to the eyes.

Baby oil can also be used. You need to apply a little drop of baby oil on the scratched portion. Then, your job is to buff the lense with the help of a clean cloth. Do it until the scratches become invisible.

  • How to remove scratches from glasses lenses?

First, you need to put little non-abrasive toothpaste on any cotton wool. Then, what you will do is rub the lenses circularly. After that, you need to remove the scratches slowly. However, if you want, you can use baking soda as an alternative. In that case, you only need to make a thick paste by mixing water and baking soda.

  • Does toothpaste really remove scratches?

Yes, you can use toothpaste to remove scratches from lenses. You only need to use a soft cloth along with a smear of non-abrasive and non-gel based toothpaste. Thus, you can remove scratches.

  • How do you get scratches out of drinking glasses?

You need to use baking soda to get the scratches out of drinking glasses. In this case, you need to mix both water and soda at the same ratio. Take the mix in a bowl. You need to stir the mix until a pudding-like paste comes. Then, you need to rub the mix on the scratched portion. You need to wipe away the remaining soda using a clear, and damp cloth.

  • How do you remove scratches from plastic eyeglass lenses?

You need to put a little regular toothpaste on a cotton cloth. Make sure that the cloth is clean and soft. You need to rub the toothpaste on the plastic lenses. Do it for 10-20 seconds in a circular motion. Now, you need to take a dampen cloth. Finally, rub the soft cloth over the lenses and remove scratches from plastic eyeglass lenses. However, you can follow the baking soda methods too.

read more
Gadgets

How to Detect Hidden Camera with Mobile Phone

How to Detect Hidden Camera with Mobile Phone

Are you going to stay in a hotel? If yes, then it’s a very worrying matter for you to check whether there is any hidden or not. Because, it’s essential for your safety purpose. Sometimes, you are unable to find the hidden cameras directly. So, be careful. But, you can get excellent technology in the market like USB hubs and bug detectors. With the latest technology, you are able to do this. In this article, we are going to define how to detect a hidden camera with a mobile phone.

How to detect hidden camera with a mobile phone

Usually, you can detect a hidden camera with your phone by scanning the network.

When you will stay at any hotel, you will get access to that local network. An app named Fing can help you in this case. Whether you have Android phones or iPhones, you can use it in your phone. The app is free to use. While using the app, you don’t need to sign in repeatedly to get extra features.

Steps to Follow
  • First, you need to disconnect all the devices that you are using at that moment.
  • After disconnecting all, connect your phone to the network where the Fing app exits.
  • Next, go to the app Fing and open it. If you’re an Android user, then click on the “Refresh” button. It is available at the top-right of the app’s screen.
  • Then, you need to permit the app to do the necessary steps given below.
  • It will start scanning the network at first.
  • Wait for a while till it doesn’t complete the scanning work.
  • As soon as the app has completed the scanning process, you can see a list of found devices. You can see the names there that are turned on. You can note the names down. And then, search for its existence nearby.
  • If the name exists, find the name of the device from the list of found devices. In case you will find something unusual or unable to locate the actual source, note down the IP address. And then, scan for open ports.
  • Here, you need to follow these steps to know how to detect a hidden camera with mobile phone.
  • First, you have to click on the “Network” button that you can get at the bottom of the screen.
  • After that, you need to click on the “Find Open Ports” option.
  • Then, you have to click on the IP address that was put down before. And then, click on the “Find Open Ports” option.
  • Next, the Fing app will find the name from the dialog box. It will help you to know which ports are on.
  • However, lastly, you can directly write the IP address in the browser to know the details of it.

How to detect hidden cameras & listening devices

These steps will let you know how to detect a hidden camera with a mobile phone.

You have to move the entire room to an RF detector. You can see different frequencies while using an RF detector. It lets you know where the microphones and hidden cameras are.

Hidden camera detector

A hidden camera detector is a professional device. The main focus of the detector is to find the actual location of the camcorders.

Hidden camera detector app

If you are an Android user, then using Glint Finder will be beneficial for you. For iPhone users, Spy Hidden Camera Detector can be advantageous. Besides, you can use normal flashlights for scanning. But before using Glint Finder, you should remember that it only supports Android 2.3 and up. It is free to use. It is compatible with the magnetometer sensor of any device along with the camera.

To know how to detect a hidden camera with a mobile phone using a hidden camera detector app, you can follow these steps.

  • First, you need to go to Glint Finder’s Play Store page. Then, tap on the ‘Install’ option.
  • As soon as you install the app, click to open it.
  • Then, click on the ‘Allow’ option to permit the app to use your camera.
  • Next, click on the ‘Allow’ option again for the second time. It grants access to your device’s location.
  • Then, click on the GNETOMETER SCANNING option.
  • After that, you have to move your phone around the suspected areas. If there is any listening device near to your phone, you can see it on your screen.
  • Then, go to the app’s main screen and click on the ‘DETECT INFRARED SCANNING’ option.
  • After that, tap on the “I AGREE” option.
  • Thus, you can easily find hidden cameras with the help of the hidden detector app.

How to find hidden cameras

Step 1: Entering into the room, split the room into quadrants. Then, check every section of your room to find the hidden camera, if any.

Step 2: Pay attention to items like clocks, smoke detectors, or coffee pots. You should check televisions, clocks, phones, hairdryers, coffee pots, etc.

How to detect hidden cameras

To know how to detect a hidden camera with a mobile phonelook at these steps.

  • You can take the help of your Android or iPhone.
  • Using flashlights on the smartphone is an excellent way to detect hidden cameras.
  • Use detector apps to detect the hidden cameras

Conclusion:

In this article, we have given brief details by following which you can know how to detect a hidden camera with a mobile phone. We hope it will help you the most.

Frequently asked questions

  • How do you scan for hidden cameras?

If the hidden camera is on and using the same network that you are using, then your phone must get to see the device’s name. If you have an Android or iPhone, you can use the Fing app. However, for the computer, you should use Nmap instead of using Fing. These apps can scan the WiFi local network and therefore help you to detect the hidden camera.

  • What is the working process of a hidden camera detector work?

When you use a professional hidden detector, it allows you to find the camera in two ways. It can find the hidden camera with the help of a flashlight or smartphone. Or it can detect RF broadcasts from a wireless camera.

  • Is there any app that can assist you in finding hidden cameras?

Multiple apps are there in the market that you can use to find the hidden cameras. If you want to use a Hidden Camera Detector app for your iPhone, it will cost $4.99. However, people who have bought it didn’t give good reviews. If you’re an Android user, you can use free apps like Glint Finder.


read more
Do It Yourself

Restricted Call: How to Block It in Android and iPhone

Restricted Call: How to Block It in Android and iPhone

A restricted call indicates the type of calls that we are unable to trace. If you are an Android or iPhone user, you must see the restricted calls appearing on your phone. These Calls are incoming calls, not outgoing. It is tough to find out the real number of a restricted call. That’s why we usually block the number on our phone. If you want to know how to find a restricted call, then go through this article accurately.

Restricted Call: How to Block It in Android and iPhone

The process to find a restricted phone number:

Usually, sometimes we receive restricted incoming calls that appear on our phones. Then, we block the number so that the number won’t appear on our phone for the next time.

If thou want, you can block the phone call’s origin only by dialing *67 before that specific number. You can restrict your call also when you don’t want someone to trace your call.

What will you do if you are facing the same issues? Here, we give some methods by following which you can find out the number of restricted calls.

Restricted Call Blocking

  1. Check your phone records: You can know the details of the restricted call by checking your phone number’s records at the end of the month. When you see your phone records, you can see all the incoming and outgoing calls. You can get your phone records from the cell phone providers. They have the full list of incoming and outgoing calls. You need to note down the exact time and date of the restricted call at the time of receiving calls. At the end of the month, thou can check the time and date with the phone records.
  1. Block restricted numbers: We usually block a number when we find it restricted. As soon as you block the number, the caller can’t call you. Therefore, they are unable to call after that. But overall, it is an effective way to get rid of the unwanted spam callers.
  1. Ask the caller: In case you have answered any restricted call, you can ask the identity of the caller. Sometimes, you can know about the caller by asking it. However, it doesn’t work all the time. But there remains a chance of getting the information about the caller
  1. Ask family members: Thou can ask your friends and family members to check the number whether they have also got such calls from the same number or not. You can take suggestions from a people who have already faced this situation.
  1. Ask the police to track the number: In case the number is harassing you, you can ask the police to take the necessary step. You need to give all the details i.e. number of the restricted call, time and date, entire phone record. They can easily track the number by using the advanced technology. Therefore, you can get real information about the number.

Process To Block A Number On iPhone:

Many procedures are there that let you know about the method of blocking a number on iPhone devices. If thou want to block any number on your iPhone, then follow the steps. But before this, you need to update your iPhone.

1) With the help of call history

Step 1: At first, thou have to open the Phone app.

Step 2: After going to the phone icon, you have to tap on the ‘?’ symbol. You can see this blue symbol next to the restricted call.

Step 3: At last, you need to select the ‘Block’ option to block the particular number.

2) Use Do Not Disturb

Step 1:  First of all, thou have to open the settings option. Then, you need to click the option ‘Do Not Disturb.’

Step 2: Then, you have to click on the

‘Allow Call From.’

Step 3:

Next, select those numbers you want to allow, like your family members, close friends, etc.

Step 4:

When you set the ‘Do Not Disturb’ mode, ‘ you need to check the other options available in that page whether their settings are accurate or not.

Step 5:

At last, you have to turn on the option ‘Do Not Disturb’ available at the top of the page.

Procedure To Block A Number On Android

If you want to know about the method of blocking a number on an Android phone, go through the steps properly.

Step 1: First, open the Phone icon.

Step 2: Then, you have to tap on the restricted call. After that, click on the ‘?’ details.

Step 3: At last, select the number that you want to block or don’t allow to call you.

Conclusion: This article let’s you know about the restricted calls, how to know about them, and how to block the restrict calls on Android and iPhones. We hope you must get benefits after going through this article.

Restricted Call- Frequently Asked Questions:

  • Should I receive restricted phone calls?

Nowadays, people usually don’t answer unknown numbers.  However, if you think that you may get any necessary call from unknown number, then you can pick up the call.

  • Can I trace a restricted call?

If you are getting harassed by any number, then you want to trace it. Usually, any private numbers, and restricted calls are traceable. If the number is unknown, unavailable, or out of the area, then you can’t trace the number due to lack of essential information.

  • Can I call back a restricted number?

When we will call the last incoming or outgoing phone number, it comes automatically into your phone. But if you are using a landline, you need to dial 69 to call the last number. Or you can dial *#69 on a cellphone to call back a restricted number or any usual number.

  • What does Restricted implement on an incoming call?

It implies that the caller doesn’t want to let you know his number. As a result, you cannot find out the number of the caller.

read more
Do It Yourself

How to Pair Apple Watch- A Complete Guide

How to Pair Apple Watch- A Complete Guide

Apple Inc. has produced this Apple SmartWatch. With the help of it, people can get fitness tracking, other essential benefits. But for this, you need to know how to pair Apple Watch with Apple devices. In this article, we will unpack the details of how you can pair an Apple Watch to a new phone, how you can unpair it, and so on. Let’s look at the details underneath.

How to Pair Apple Watch to new phone

  • After buying the Apple Watch, your first job is to power the iPhone and Apple Watch.
  • After that, download the band. You only have to tap the button and hold it for some time.
  • Next, what you have to do is to wear the Apple Watch in your wrist. You should look Whether it fits in your wrist or not.
  • Then, press and hold the button again and switch on the Watch. As soon as thou see an Apple logo on display, you need to remove your hand from the side button.
  • Then, you can see a pairing option on your new iPhone. Click on the continue button. You get to see a pattern of blue particles come in front of the screen on the new Apple Watch. Then, you need to keep the iPhone near the Apple Watch. As soon as you will do this job, you can pair these two devices.
  • Next, what you require to do is to click the setup option on your phone. You need to follow the methods appropriately to complete the setup procedure. While doing this, you can transfer the backup details from the old model of your Apple Watch to the latest one.

How to pair Apple Watch manually:

Are you unable to use the game of the iPhone device that you want to pair with your Apple Watch? Then, you can do it manually.

  • You can see an option available at the bottom part of the screen of the Apple Watch.

Next, you get to see the pattern of blue particles on the screen. You need to click the ‘i’ option quickly. By tapping on the alternative, you can get information about the manual process. Then, you can see a code containing six characters.

  • After getting the code, you have to enter it in the new Apple device. Then, wait for some time until both of these get paired. After pairing, you can go for the setup program.

How to unpair Apple Watch from an iPhone

When you unpair the Apple Watch,  what you have to do is keep a backup of your Apple Watch. Then, you can remove your new Apple Watch from your phone. As a result, you can get all the details available in the new Apple Watch.

  • First of all, you have to go to the Apple Watch application that you have downloaded on your device.
  • After that, you are required to go to the My Watch tab option.
  • Then, you can see an option named as Apple Watch at the upper part of the display. You need to click on it then.
  • After going to the next slide, you get to see the ‘i’ option. You can see it beside the Apple Watch option.
  • At last, click on the Unpair Apple Watch option. Then, you will get two options for either keeping it or removing it. And then it will ask you to put an AppleID password. Now, thou need to wait for a minute. After some time, you can see your Apple Watch unpaired from the factory settings.

The process of backing up your Apple Watch

You can transfer the data from your old Apple Watch to a new one. But it depends on the setup process that thou are going to use for pairing.

 Choosing the Automatic Setup process

Here, we are defining the process of automatic set up. Let’s have a look at this method.

  • First of all, you should look at whether you have done the unpairing method or not.
  • If you have not done yet from the old device, do it quickly.
  • After that, you are required to fix the new iPhone model from the iCloud.
  • Then, completing the entire setup procedure, you need to go to the Apple Watch app. After going to the Apple Watch option, click on it.
  • And then open it to fix the Apple Watch to get the backup details. But you have to check whether you can store the details to iCloud or not as you may lose the essential backup information.

The process of switching the Apple Watch’s LTE account to the new iPhone

Have you bought an LTE Apple Watch? Then, you must have a cellular plan for your Apple Watch. It is because it can help you to attach the Apple Watch to the iPhone account. While doing this process, you don’t need to transfer the cellular plan to the new iPhone device you bought. Here, we have given some steps by following which you get to know how to pair an Apple Watch LTE account to a new iPhone.

We can assure you that you must get benefit by following this process.

  • First, go to the current carrier to delete the previous Apple Watch plan. But make sure that you are not deleting the current iPhone plan.
  • Then, look at the guidelines of the recent carrier to fix the latest plan.
  • After that, what thou have to do is to fix the Apple Watch. For this, you need to follow the instructions that you will get from the new carrier.
  • At last, add the new iPhone account to the Apple Watch.

Frequently Asked Questions:

  • How can you pair an Apple Watch with a new iPhone?

If you want to pair both an Apple Watch and a new iPhone, you need to keep them close. You need to check whether the airplane mode in your iPhone is off or not. But at first, keep the WiFi and Bluetooth turned on. Then go to the Control Center and switch the Airplane Mode off. At last, restart the Apple Watch and the iPhone.

  • Can I pair an Apple Watch without an update?

You can’t pair Apple Watch without updating. While updating the software, make sure it is fully charged. And at the time of updating software, keep the iPhone off.

  • What will I do if the Apple Watch gets stuck while pairing?

First, go to the Apple Watch app and then open the software update option. Then, remove all the updated files. After that, you have to restart your Apple Watch and iPhone.

read more
Do It YourselfTechnology News

Connect Multiple Bluetooth Speakers Android

Connect Multiple Bluetooth Speakers Android

Nowadays, there are many Bluetooth devices available in the market like Google Home, Amazon Echo, etc. If you want to connect multiple Bluetooth speakers Android at a time, you can take the help of apps such as AmpMe, Bose Connect, etc. These Apps also allow you to send any audio at the same time.

In this article, we are providing a procedure by following which you will be able to connect multiple Bluetooth speakers Android.

By following the method, you can pair multiple Bluetooth speakers with ease.

Using AmpMe app to Connect Multiple Bluetooth Speakers Android

Among all types of Bluetooth devices, AmpMe is the most helpful app as it can be used in a versatile way. And while using this app, you don’t need to have any specific brand Bluetooth. It is one of the special benefits that AmpMe offers to its users.

  • First, you need to install this application.
  • Next, use your Facebook account or Google account to sign up.
  • After that, check whether any of your contacts are using this AmpMe app or not.
  • Then, you can start enjoying with your friends and family.

Apple HomePod Stereo Pair:

The setup procedure of a HomePod stereo pair:

While setting up a HomePod, you get to see an option. It asks you to use both speakers as a stereo pair. Besides, if you are an Apple user, you can fix a stereo pair with HomePod speakers.

  • First, you need to place two HomePod speakers in the same room.
  • Then, go to the Home app. And press it for a while.
  • After that, make a stereo pair.
  • Next, you need to select the second HomePod that you use as a stereo pair.
  • Then, click on the HomePod on any side to identify it. And then, swap these two.
  • At last, click back option. And then, click on the ‘Done’ option.

Samsung’s Dual Audio Feature:

Want to pair two Bluetooth earphones into a single Samsung device? Then, Samsung Dual Audio can help you in this case.

 The process of using Samsung Dual Audio with dual:

  • First of all, you need to pair each headphone with the Samsung device.
  • Then, open the settings.
  • After that, what you need to do is to click on the Bluetooth option. And then, you need to switch on the slider.
  • After that, enable Bluetooth pairing mode available in your headset. Sometimes, thou may need to press and hold it for some time.
  • After that, go to the notification option. And then click on the media.
  • Then, you need to go to the Samsung device that you are going to use.

Android pie features

  • It helps to line up all the apps in a horizontal row.
  • For the pixel users, Android Pie allows us to copy and share it easily.
  • It has improved battery life. As a result, it can detect which apps we use most.
  • Besides, the battery saver mode closes all the apps that can consume much battery life.
  • Can you connect 2 Bluetooth devices to Android?

Yes, you can connect two Bluetooth devices at a time to Android. People who have Bluetooth devices like Android Auto; Smartwatch, Bluetooth headphones must get advantage from this latest update.

  • Is there any app to Connect Multiple Bluetooth Speakers Android?

Yes, there are a few apps that can assist you to connect multiple Bluetooth speakers. The names of the apps are AmpMe, Bose Connect, Ultimate Ears. However, if you keep your Bluetooth headphones and smartwatch with you always, you won’t require any app.

  • Can my phone connect to multiple Bluetooth devices at once?

Whether it is any smartphone, laptop, computer, or any tablet, thou can connect your phone to any Bluetooth devices at a time. For doing this, you have to go to the settings app available on your device. If thou are using Windows 8.1, you also have to follow the same procedure for setting up many Bluetooth devices.

  • Can you connect multiple Bluetooth speakers to TV?

The smartphone you have can quickly help you to manage the paired Bluetooth devices. The models of the speakers and TV sets are different. You should have a efficient app on your phone that can help connect multiple Bluetooth speakers to TV.

  • Can you Connect Multiple Bluetooth Speakers Android?

If you are using any old versions of Android, then click on the option’ menu’. You can get it at the top of the right side. Then switch on the dual audio toggle button. If thou want to use it, you have to connect it with two other speakers. But if you are using any Android pie, then you can experience an advanced process.

  • Can we connect 2 Bluetooth devices to one laptop?

Usually, you can pair your device with one headphone or music stream. But you cannot connect two speakers at a time with your device.

When you are using a laptop, you can pair it with multiple Bluetooth devices at once. But it is only for those devices that contain the “multipoint

functionality” option. In this case, it doesn’t matter which type of adapter you will choose.

  • How do I connect multiple Bluetooth speakers to my laptop?

To connect many Bluetooth speakers with a laptop, you can follow these steps given underneath.

  • At first, you need to collect some speakers which are of similar brand. If you get the same model, then it will be helpful for you.

However, you can use various models of the same brands. It doesn’t make any significant issues.

  • Then, charge the speakers to connect these laptops you have. Sometimes, people face difficulties while pairing their speakers with the computer. That is why we have given some simple but effective steps by following which you can pair Bluetooth devices with your laptop.
  • If you want to access the Bluetooth settings quickly, you should have an updated windows version. In case you have an old version of windows, then you need to press the Windows key. And click the “F” button at a time.
  • After that, you get to see a windows search option. Here, you need to write the name of the device that you want to connect. After that, tap on the ‘enter’ button of your laptop.
  • At last, you get to see an “Add Bluetooth

device” option. Tap on it.

  • How do I stream music to multiple devices?

If you want to stream music to many devices, then you can follow the instructions that we have given below.

Step 1:

At first, you have to pair all the devices.

Step 2:

Then, sync the clocks.

Step 3:

After that, you need to choose any time while going to start this process.

Step 4:

Next, share the starting time to all those devices where you want to stream.

Step 5:

Then, keep all the devices in sleep mode. And keep it until the time that you have set up will begin.

Step 6:

At last, you can play or stream music.

In case you face any problem in this entire process, thou have to fix it again. Besides, while using multiple devices, you should not keep many background apps in running condition. It is because these can reduce the playback speed of streaming music.

  • Can you play 2 Bluetooth speakers at the same time on an iPhone?

According to the latest updates, the iPhone is coming with a new double Bluetooth system. With the help of this system, one can send any audio or music to the other two connected devices. However, now Apple also allows us to connect multiple Bluetooth earphones, speakers, etc. But the difference is that you cannot play the audio in two devices at a time.

  • Can you use 2 Bluetooth headphones at the same time?

Yes, you can use and pair two Bluetooth earphones in a single time. Bluetooth multipoint can help you to use two Bluetooth earphones easily. For example, you can use your laptop or computer and your phone at the same time.

  • How do you connect two Bluetooth headphones at the same time?

Bluetooth multipoint is helpful in this case as it allows you to connect many devices at a time easily. Thou have to go to the settings option and click the Bluetooth multipoint option.

  • Can you pair 2 Bluetooth headphones at once?

It is a simple method. For this, the only thing you are required to do is to switch on the Bluetooth device at first merely. Then, connect these with Bluetooth multipoint earphones. You have to keep these both earphones in pairing mode. Then, pair the first earphone. Next, you have to keep these in pairing mode again to connect the second one.

read more
SoftwareGadgetsInternet

Capture Card: A Detailed Overview Everything You Need to Know

Capture Card: A Detailed Overview

Best capture card can change your streaming level completely. When you want your stream to function smoothly, have the highest frame rates. As well as the best quality, a card is essential.

Alright, you have to start your creation by targeting a card or computer that can stream at the maximum resolution at the lowest price. Thereby providing you with the most worth for your deal. That sounds simple, but the cost to deal ratio will shift the right match for you and your equipment.

For this reason; this is especially important for streaming beginners.

What is a Capture Card?

A capture card is a gadget that lets you record and stream games from your video game consoles. The best card is part of the most exceptional streaming system. Even when your graphics card or processor can do the task, you can lower the pressure on your first gaming Laptop by a perfect capture device. So that you can enjoy high-quality streaming and reliable frame rates at once, even, the best capture cards will extend the gaming arsenal throughout PC platforms.

Types of Capture card

Capture Card for Xbox one

Users having Xbox one; may confuse why they require a card for PC. Especially when they already have capabilities for capturing and streaming. One of the points for having it; you will have more control over your recording capabilities. Using a game card one can record more protracted periods of Game-play.

Capture card for Xbox one is of good quality, so there’s no worry about too much storage taken up on your screen. You need to pick the right game capture card for Xbox one.

Capture card for ps4

If your wish is to enter the world of gaming. Yes, you are on the right page. Of course, you do have your PS4, trustworthy sticks, a comfortable headset, and microphones but is that sufficient?

You might think you have everything, but let me tell you something important is still missing, i.e. A capture card for ps4.

It offers you to record game-play on consoles such as ps4 and PC in the possible excellent quality. With the use of a card, you need not worry about various hurdles in capturing or transferring your gaming footage. One of the great things about getting a capture card is that there’s no time limit to care about.

Card Switch

Your Switch would need to be in a docked position to use it properly. Unless you are using it in handheld mode, the streaming process won’t be complete. Disable the HDMI cable from your TV, and instead plug it into your capture card’s input port. If you use an external capture card now is the way to connect it with a USB cable to your PC.

First, you’ll want to take a second HDMI cable, and run it on your card to your TV from the output port. Congratulations, Mr leader!

HDMI capture card

It’s simple to find the best HDMI capture card. Initially, it would help if you understood the types of systems you would like to attach to. Then you will begin to consider where you want to assign to those devices. Before that, you’re required to ask yourself if you’re an existing video producer, or just beginning. These questions will help direct you to the correct HDMI capture card itself.

Compatible devices

Almost everyone wants a recording device. With their choice of streaming software; everyone avoids learning new software. You will also prefer considering operating system support. As this is easy to deal with. We can assume that you are not using a decades-old pc or console.

Portability

  • Portability implies it is small enough to fit into your pocket. You can carry easily in your hands.
  • For durability, detachable cables are superior. On the other fixed wires are better for portability.
  • Fixed cables are also easy to use.

Do I need a capture card?

Most users mostly feel uncertain, whether or not they require a card. In case you are among them. There are a few common capture card advantages listed below. You can make the correct choice:

  • It offers high-quality video. It also provides storage streaming.
  • Keep yourself apart from the rush. For streaming, you have the choice to use custom overlays.
  • It supported streaming is of high quality and lag-free. This is what makes users feel great always.
  • Even on external storage, Users can easily create and manage video library.

What do you need to point for a card?

In search of a Great Capture card? The one as similar to easy switch-and-play solution as needed, right out of the box. Of course, you would like to play, stream, and capture as efficiently and smoothly as you can. A Capture card that can do this will be a performer. Besides that, you’ll also need the price you want.

What is a USB  card?

Hardware which we can use for translating the digital signals from the camera output into a digital format is commonly known as the USB Capture device. The one your computer could identify quickly.

USB capture cards are popular as they are portable. Also, the size is convenient. In a small duration of time, these devices keep on evolving.

Need Card for YouTube?

A High-quality card is a must for you if you love sharing game-play videos. You can expand a YouTube channel by getting all the game footage that you require to create awesome videos.

How to Choose the Best Capture Card?

Choosing the best card depends on the type of topic you wish to create. Either you record videos for later editing, or concentrate on playback? Several cards are better as compared to others. Video resolution varies from card to card too, especially for streaming.

It would help if you kept in mind some of the things when you are planning to purchase a capture card for PC. Of course, you need to spend your money on the right device. Four essential points you should consider involves:

Price is one of the significant factors of buying a card is its price. You are not required to purchase, a costly capture card if you want to store a few infrequent videos.

  1. Video Quality

Undoubtedly, your capture card should have sound quality. Also providing additional support to high-resolution pictures. Indeed, the frame rate needs to be high as well.

Users who wish to track intense games. Should look either for Full HD or 4000 resolution. This enables capture cards to give excellent feedback. Rendering videos on a powerful device is necessary. In case you wish to use capture cards with 4k resolution standard.

  1. Computing

Before purchasing your new device for live streaming, make sure to check; whether your card and hardware specifications are matching. Gaming consoles like PlayStation 4; Xbox one; etc. use HDMI transfers to support it.

With several hardware factors, such as storage capacity, speed, and memory, etc.; A Capture should be ideal. A user should buy a card from recognized sellers as this provides support and helps through tutorials, customer support, and user guides. This will allow users to deal with different practical issues.

  1. Simple to use

The best Game card provides a long list of characteristics; that help users at different levels. In case you want to utilize any feature, you will have to explore the right process. It is, therefore, essential to read the user manual properly. Or you need to take help from the technical staff. Any device that is easy to handle is the choice of every user.

read more
Gadgets

iPad Hard Reset, Factory Reset: The Ultimate Guide

iPad Hard Reset, Factory Reset: The Ultimate Guide

You have the first instinct to force your iPad hard reset when your iPad act up or encounter a bug. This great tip handles small bugs (from battery problems to UI glitches) on the operating system. When the iPhone or iPad reset, the data on the device is completely erased and restored to the factory reset iPad. In the following guide, we will explain the typical iPad hard reset cases.

The post deals with all iPad device models and discusses how you can do both a quick restart and an iPad hard reset. This post offers other resetting solutions for an iPad as well.

How to Restart iPad: All Possible Ways

iPad Soft Reset

The simplest reset can fix several minor problems during phone use. The Soft Reset will be the first reset and also the first step to address some issues while attempting to address a bug on the device. This reset takes the cell phone off and switches it on. The Soft Reset causes no data loss on the iPad.

iPad Hard Reset

A final reset typically tries to fix the problem after all resets have been attempted and unsuccessful. iPad Hard Reset intends to address serious iPad issues. iPad hard reset the device to default settings.

Difference between Soft Reset and iPad Hard Reset

  • Soft reset fix troubles including not getting messages, device not working, phone hold, email issues, audio/video issues, incorrect time or settings, etc. In contrast, iPad Hard reset fix troubles reset when you will find your screen does not respond to tapping or your iPad freezes.
  • You never lose any data, as you reboot your phone in soft reset while iPad hard reset wipes your device’s settings to revert it to its original setting.
  • You can use soft reset with power buttons while iPad hard reset operations vary from phone to phone, as the operating system, the software version, and the model for iPad matter.

Factory Reset iPad

Whether after attempting iPad hard reset or soft reset, you still have trouble with your iPad, or even wiping your iPad before selling it, so you may like to learn how to factory reset iPad:

  • Go to Settings > General > Reset and tap Delete all material and settings.
  • Tap Erase and verify the iPad.
  • When the process is complete, the setup screen welcome as it was before you bought it. It may also configure as new, and you can also restore your backup data.

How To Factory Reset iPad If You Forgot Password With iTunes

ipad restore
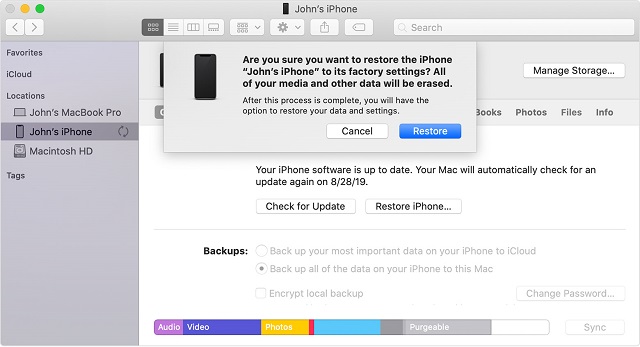
iTunes is not only a music listening tool, but you can also use it for backing up iPhone/iPad and quickly restoring the device. You might restore the iPad from a device backup if you synced the iPad previously with iTunes. Follow the appropriate directions:

  • Attach the iPad with the USB cable to your computer.
  • Start iTunes and tap on the left side of the iTunes iPhone button. Fix it with appropriate methods if apple can’t recognize the iPad. When iTunes requests a passcode from the iPad, plug it out and move it to Section 2.
  • In the right-hand column, click on “Back Up Now.” So when the backup is over, press “Restore Backup.”
  • Pick your iPad and press the ‘Restore’ button to reset the iPad.

How to Factory Reset iPad, If You Forgot Password with Recovery Mode

If your iTunes backup is not available, you can still reset the iPad in its recovery mode without a passcode. Do it as the guidelines below:

  • Tap the Sleep / Wake “button for a few seconds on your iPad unless you find a red slider. To turn off the iPad swipe towards the right.
  • Keep down the “Home” button to turn on the iPad and hang on to the device with a USB cable while connecting it with the computer.
  • Activate the “home” button anytime you see a pop-up saying “Connect to iTunes,” meaning that the iPad is now in recovery mode.
  • Execute iTunes. Then you can see iTunes warning that it detects a recovery mode device.

Prepare iPad for Resetting 

ipad factory reset
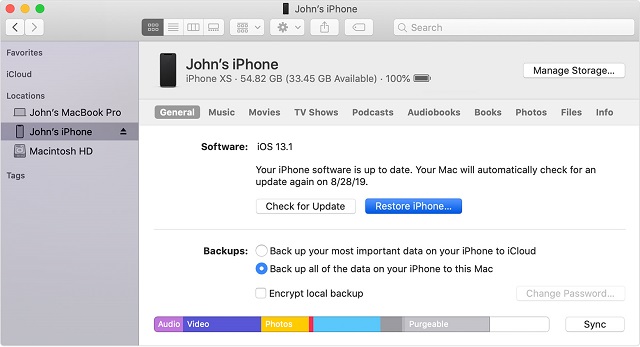
Just note a few things before moving to the backup options:

  • You must disable Find My iPhone: settings > device name > iCloud > Find My iPhone > switch off before you erase material from the app.
  • Upgrade it to the last edition, if you back up with iTunes.

What happens when you do an iPad hard reset?

It depends on the kind of configuration you select. Go to “Settings > General > Restart,” and your iPad will experience the following situations:

  • Reset All Settings
  • Erase All Content and Settings
  • Reset Network Settings
  • To Reset Keyboard Dictionary
  • Reset Home Screen Layout
  • Reset Location & Privacy

How do you reset an unresponsive iPad?

When you try to shut it off, iPad is unresponsive, and you have to reset it with the following: 

Tap and hold Sleep / Wake as well as Home for at least 10 seconds at the same time, until the Apple logo shown.

How do I do a hard reset on my iPad Pro?

Press the volume up button for 1 sec and then press volume down for one second. Click and hold the Top button at least 5 seconds.

Wait until the Apple logo appears and then press the Top button.

Conclusion

If you install so many applications, iPads tend to misbehave and slow down. Luckily, Apple enables customers to configure the iPad in initial factory settings so they can experience the features of an all-new iPad with wiping. You choose a soft reset or a factory reset iPad, both the process is effortless.

read more
Gadgets

Xiaomi Mi Box 4K Review and Specifications

Xiaomi Mi Box 4K Review and Specifications

Xiaomi Mi Box 4K is a direct competitor to the Amazon Fire TV Stick. Similar to Amazon Fire TV Stick, it also makes your old TV into a smart TV. The Mi box 4k is cheaper than Amazon Fire TV Stick. Mi Box 4K uses the same android interface and bring the Android TV interface to your TV screen. The difference Mi Box works on Android and Fire TV Stick works on forked version.

Xiaomi Mi Box 4K Review

The Android support helps the Mi Box use the Google Cast. Using the Google Cast you can cast wirelessly from your phone to TV as long as they are using the same Wi-Fi network. Except Dolby vision technology, Mi Box support both 4K and HDR10 playback as that of Fire stick. Since Xiaomi Mi Box 4K fully driven on Android, Google Assistant voice support is available.

Unfortunately there is no preinstalled media player apps comes with the bundle. But the file manage app available in Google play store can serve the purpose of playing content of various formats including HDR.

Should you Buy it or Not

Mi Box 4K comes with its own remote. With the help of the remote you can navigate all around the interface. With the help of the remote control you can adjust the volume, open apps and more. This remote works on Android TV without Patchwall support. In addition, the remote connect with the TV via Bluetooth. The negative side of the Remote control is more. It is lack of a remote mute button. You can do the basic controls only with the help of the remote.

Since Google Chromecast functionality enabled with Mi Box 4K, it supports casting up to 4K solution.  Moreover, We can mirror our screen or cast it directly from our supported apps on other compatible devices. Even you can your local content by plug in your USB drive in your Mi Box 4K.

Mi Box 4K supports HDR up to HDR10 standard. Since Amazon prime and Netflix can be played in HDR10, it is worth for the price. The Mi Box 4K comes with data saver function, which helps you to reduce the bandwidth usage during video streaming. This feature is helpful for those who use mobile hotspot or internet with bandwidth and data cap.

Xiaomi Mi Box 4K Pros and Cons

 Pros:

  • Android TV without Bloatware
  • 4K streaming
  • HDR  upto HDR10 standard
  • USB Port
  • Worth for the money spent.
  • Google Cast
  • 4K Android TV set-top box
  • HDMI2.0a

Cons:

  • No Dolby Dolby vision technology
  • No Mute Button on Remote
  • Remote lacks some basic functions


read more
Gadgets

JBL Club One- Wireless Headphones with Hi-Res Sound Quality

JBL Club One- Wireless Headphones with Hi-Res Sound Quality

People these days prefer wireless headphones and earphones more because of the comfort these gadgets provide. JBL has launched its CLUB Series. This series consists of Club One, Club 950NC, and Club 700BT. JBL has never failed to provide the right quality products. And in this blog post, we will review the top model headphones from the JBL CLUB series- Club One. Let’s see if this wireless headphone is best at its quality and all other aspects.

JBL Club One- Design:

The appearance of the all-new JBL Club one is sturdy and robust. Don’t worry! The headphones made of high-quality materials and premium design details. That includes the durable metal hinges, leather headband and cushioned over-ear cups that add to your comfort. The ear pad does not press your skull or ears. We will be able to see the orange-colored drivers inside the ear cushions through the transparent fabric. These pro-inspired and HI-Res certified wireless headphones deliver audio tailor-made for your ears. The design of all new JBL headphones is quite impressive. I personally love it!!

The ear cushions also have tiny physical buttons on them. You can use the buttons on the right ear cushion to control the volume. In addition to that, you can also play the next or previous track by holding the buttons a bit longer. On the other hand, the left ear pad contains the standby button, the Bluetooth button, and the Smart Ambient button. The aux port placed on the left Earpad. The headphone weighs around 378.5 g

Even the case in which the folded wireless headphone is transported is beautifully designed. Along with this, the JBL also provides two cables and two adaptors- a USB cable, an airplane adapter, and a 6.3mm adapter. The case offers maximum protection for the headphones, but unfortunately, there is no space for the cables or the adaptors.

In addition to all these, the black and equally metallic finish makes the new JBL Club one look stunning.

JBL Club One- My JBL Headphones app:

You can access the My JBL Headphones app for some of the functions and extra options. To use the app, you don’t have to create an account. When you connect it the first time, you need to connect via Bluetooth. Once connected, you choose the options accordingly. You can even adjust sound effects according to your choice using an equalizer.

You can even set the ‘Smart Ambient button’ in the app by choosing two different options. Firstly, the “Ambient Aware,” with which you can let the ambient sounds to come through. Secondly, the “TalkThru,” which will help you create conversations even when your headphones are still on. In this app, you can also enable or disable ANC.

You can use the app to change the settings of this wireless headphone. My JBL Headphones app looks so neat and modern. But there are still a few minor flaws that need to be taken care of.

Club One- Sound Quality:

Sound quality is the primary factor that will decide if the headphones or the earphones worth the money paid. The all-new JBL Club one provides high-quality sound effects. The wireless headphone delivers even the powerful bass at its best. The high notes are so bright- not too sharp or too dull. To provide a wide range of detail and clarity, the JBL has designed the headphones with Hi-Res audio, Legendary JBL Pro Sound, and a 40mm custom orange Graphene driver. But the Club one headphones does not excel in Jazz or any other classical music.

When you have your JBL Club one headphones in hand, you don’t have to look for a quiet, peaceful place to take or make calls. JBL has put Dual Mic Technology in its new wireless headphones to cancel out even the ambient noise. The Active Noise Canceling functions so well. It helps us to listen to music without any distractions.

Club One- Battery Life:

The battery of the Club one wireless headphones is made up of Lithium-Ion. The JBL Club one lasts up to 45 hrs without the ANC and 25 hrs with ANC. This wireless headphone lasts a bit longer than any other headphones that were launched at that time.

JBL Club One- Price:

The all-new JBL Club One wireless headphone cost around $349.95 each. The headphones have a few minor flaws that must be taken care of. But still, the gadget is worth buying. You can definitely buy this Club one headphone if you are looking for a headphone that provides the best sound quality.

read more
GadgetsTechnology News

WatchOS 7 Adds Significant Personalization to Apple Watch

WatchOS 7 Adds Significant Personalization to Apple Watch

Apple may not have added a ton of features to it’s smart watch by way of WatchOS 7 but the update to Apple’s smart watch line up is nevertheless a significant one. Apple revealed WatchOS 7 at WWDC 2020 where it normally releases news of such things. At the event Apple showed off some of the new features that will sit inside it’s watch. The official version of  WatchOS 7 will only come out this fall but the beta version of it is out for developers to tinker around with. At the end of the keynote dealing with  WatchOS 7, there were not many features that will be released with the OS. However the few features that will be released have got us excited. So let’s take a look and see what WatchOS 7 has in store for us, shall we?

WatchOS 7 in a Jist:

WatchOS 7 may come with a few features but the features lined up will surely grab your attention. A new feature that will sit inside the OS is going to be a timer that automatically starts when you wash your hands. This is to ensure that you get in the needed 20 seconds amidst this period.

Apart from the hand washing countdown, Apple watch will also be able to tell you how many calories you burn when busting a move on the dance floor. But besides all these minor features, Apple’s WatchOS 7 will undergo changes that will make you reassess your use for the watch. With these changes in tow you will change the way you interact with your watch. Now you will be able to change the face of the watch so that it suits your needs and tastes more, you will also change the way you interact with the watch at bedtime.

Apple will no longer have full control over your Watch Face in WatchOS 7:

Up until now you would be able to only add one app onto your watch face. And that to from an app that was Apple. But now with WatchOS 7 you’ll be able to add more complications as well as information onto your watch’s face. Not only you but third party app developers as well. For example you can set your daily agenda, get a weather report and get a shortcut to messages all from your watch face itself.

With this new feature under the hood you’ll even be able to see multiple updates from the same app.

Track your Sleep Patterns with Latest WatchOS Update:

With this new feature in tow you’ll not only be able to track your sleep patterns but will also be able to wind down before you eventually go to sleep. Other smart watch manufacturers have had sleep tracking on their watch menu for years. With latest WatchOS update, Apple has also added the feature to the agenda.

Share Custom watch Faces with WatchOS 7:

This new feature will allow you and app developers to customize a watch face based on your needs and information layout patterns.

read more
1 5 6 7 8 9 15
Page 7 of 15