close

Technology News

Do It YourselfAppsInternetInternet SecurityTechnology News

How to Fix ERR_SSL_VERSION_INTERFERENCE Error

How to Fix ERR_SSL_VERSION_INTERFERENCE Error

When it comes to online, you can find plenty of online fraudsters trying to crack a password code, steal information like personal, payment related, etc. In this case, it is good to install an SSL certificate to offer protection against online fraudsters. If you know the method of troubleshooting the problem, you can easily access a website or page. Here, we have discussed the process of fixing the ERR_SSL_VERSION_INTERFERENCE issue in Google Chrome.

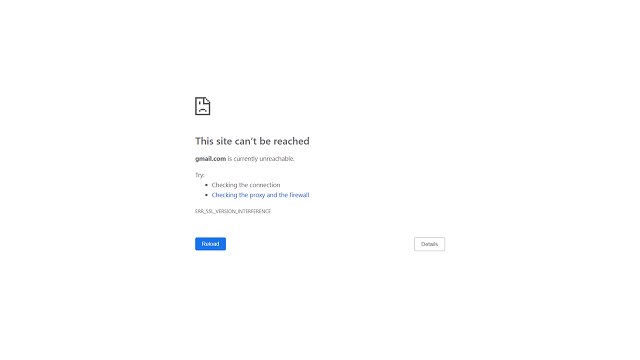
What is mean by the ERR_SSL_VERSION_INTERFERENCE in Google Chrome?

ERR_SSL_VERSION_INTERFERENCE is a type of error that you can face while browsing a site with the help of Chrome or Firefox browsers. When your browser fails to load the visiting page with SSL protocol this type of error may happen. stands for ‘Secure Sockets Layer.’ It uses TCP sockets to transmit information. We are using the browser Google Chrome that enables us to communicate with secured sites such as YouTube, Google, Facebook, etc.

While you see the problem, it means that your system is facing errors in determining the SSL version. It may also happen that your device has an SSL version conflict. Generally, you are capable of fixing the problem efficiently.

The error generally happens while the network server uses TLS1.3. You can fix the error in a few ways. According to some guides, you should disable TLS1.3 entirely in your browser. However, it is not preferable because TLS1.3 provides more security features than TLS1.2 and lower TLS versions.

A mismatch in the TLS1.3 version that is compatible with the browser and the web server may be a reason for the problem. You should know that the TLS1.3 is still developing now. Therefore, if your browser is compatible with the latest TLS1.3 only, but you have the older version of this, then it can cause errors. However, what you should try the first time is to update the browser. It is always recommended to have an updated browser. The reason is that the recent version of the browser must come with the newest security features.

When you find the error caused due to web browsers, the error may happen for the update of your browser.

Why Do You See This ERR_SSL_VERSION_INTERFERENCE Error?

Multiple reasons are there due to which the error happens in Google Chrome. We have given a few here.

  • The site you want to use is not compatible with a mutually agreeable TLS protocol version. TLS 1.3 is supported merely by the server or the client. No other party is capable of supporting this.
  • You are unable to use TLS 1.3 with the earlier versions of the protocol.
  • A few sites are there that are not comfortable with 1.2. If you use any recent browsers, then it won’t create a problem.
  • The SSL you have maybe expired, or it might not be installed properly.
  • Your system may have an improper date and time.
  • Hardware acceleration can cause an error.
  • Google Chrome may be outdated, or the antivirus you are using may not be up-to-date.
  • Having corrupted browser cache data can cause the issue also.

How to Fix the ERR_SSL_VERSION_INTERFERENCE Issue in the Google Chrome (for Owner):

We have given here the process of solving the error in Google Chrome.

Check Your Server Configuration:

If the browser is updated, it may happen that the webserver has been using an old TLS version. Hence, you should check the server configuration.

Look at the SSL:

  • You should check the SSL with the help of an SSL checker tool. Use the tool to check whether you have installed SSL correctly or not. If you find this not appropriately installed, then you should reinstall it.
  • You should see also if the SSL has validity. If you are willing to check the validity of the SSL, you should navigate to the address bar. Then, you are required to hit the padlock icon.
  • Now, you will see a box popping up. Then, you should select the option Valid available in the box below the Certificate tab. Tap on the option.
  • You can see the expiration date available in the list alongside the Certificate icon. Whether the SSL is no longer for use, it needs to be renewed. If you want, you can use a new SSL.

Disable TLS 1.3:

Whether the browser you are using is running in TLS 1.2, then you can face the error. Then, you should check the server’s configuration and enable the configuration to support TLS 1.2.

  • If you are willing to disable TLS 1.3, you should first open the Chrome browser.
  • Navigate to the address bar after that, and then you should write chrome://flags/. Tap on the Enter button at a time.
  • Now, you can view the flags options.
  • Move to the flag search box after that, and then you should write TLS to look for5 the TLS 1.3 option.
  • You are required to select the Disable option from the dropdown menu.
  • After that, you should tap on the Relaunch option to start the browser again.
  • You need to check the site displaying the ERR_SSL_VERSION_INTERFERENCE error.

How to Fix ERR_SSL_VERSION_INTERFERENCE Error (for Visitors):

Check Time and Date :

  • If you are willing to check the time and date in Windows, you should first tap on the Start key.
  • Then, you should tap on the Settings option.
  • Now, go to the Start menu and then tap the Settings option.
  • When you open the menu, you need to look for the option. As soon as you find this, tap on it.
  • After that, you should turn on the Set time and Set time zone automatically.
  • Next, you are required to begin the chrome browser again. Then, you should navigate to the site showing the ERR_SSL_VERSION_INTERFERENCE error.

Disable Antivirus Software:

When you disable your antivirus software, you should try to update it first to the recent version. In case you are facing the problem still now, disable the antivirus software.

  • If you are willing to uninstall your antivirus software, then move to the taskbar.
  • Then, you should look for the hidden trays. After that, you need to tap on the option.
  • Now, you have to find the security software icon. Then, you should tap on this and select the Exit option.
  • Next, your job is to tap both CTRL + SHIFT _ ESC buttons. As soon as you press these, it will take you to open the Task Manager.
  • After that, you should look for the tasks that are linked to the antivirus engine. Then, you should close these.
  • Now, your task is to tap on the Start option and then write ‘Control Panel.’
  • You should then move to the Programs option. After that, your job is to navigate to the option Uninstall a program.
  • Next, select the antivirus you prefer. Then, you should tap on the option and choose the Uninstall/Change option.
  • Finally, the on-screen instructions are seen. You should follow those instructions.

Erase Browsing Data:

Check out these steps for removing the browsing data on chrome.

  • First, your task is to launch the Google Chrome app.
  • Then, you need to tap on Ctrl+H that are available on the keyboard. As soon as you press these, it will open the browsing history along with other stored information.
  • Navigate to the left-pane menu after that. Then, your job is to tap on Clear Browsing Data.
  • You can see here a new window popping up. Ensure that the Advanced Tab is opened.
  • Then, you are required to choose all the boxes.
  • Next, your job is to tap the Clear Data option.
  • Finally, your task is to relaunch the browser. And then, check if the error remains.

Disable Hardware Acceleration:

If you are willing to Disable Hardware Acceleration, you should follow the steps below.

Follow these steps:

  • Go to the browser Google Chrome and open it.
  • Tap on the ‘Menu’ option. Next, your task is to the Settings option. Hit the ‘Advanced’ option now.
  • Here, you should find out the category System.
  • After that, you have to turn off the option Use hardware acceleration.
  • At last, your job is to disable the hardware acceleration.

Flush DNS Cache:

Whether there exists any corrupt local DNS cache, you may not be capable of reaching servers quickly.  That’s why it is always better to flush the DNS cache.

  • First, your task is to tap both Windows Key+S buttons on the keyboard.
  • Then, you should write “Command Prompt” in the prompt box.
  • After that, go to the results and then tap on the Command Prompt option. You should now choose as Administrator from the results.
  • When you find the cmd up, you are required to run this command following command:

ipconfig /flushdns

  • After the completion of the method, a message appears in front of you:

Windows IP Configuration. Successfully flushed the DNS Resolver Cache.

Disable and Eliminate Browser Extensions:

The browser extension you are using can cause the ERR_SSL_VERSION_INTERFERENCE error.

  • If you are willing to eliminate these installed browser extensions, move to Google Chrome and open it.
  • Then, your job is to go to the Menu option and then select the option More.
  • Look for the More Tools option after that. Next, you should choose the extensions in the menu.
  • You are required to disable extensions individually. Delete the extension until you find the specific extension causing the problem.

Disable QUIC Protocol:

We have given here the steps of disabling the QUIC protocol.

  • First, your task is to move to Google Chrome and open it then.
  • After that, your job is to navigate to the address bar. Then, hit the enter button after typing – chrome://flags/#enable-quick.
  • You can keep this Experimental Quic Protocol default.
  • Finally, you are required to disable this and restart the browser. You should move to the site where you can face the error.

The Bottom Line:

In this above post we have shared some tips to resolve the ERR_SSL_VERSION_INTERFERENCE error. read the entire post before proceeding to resolve the issue.  It is essential to have an SSL certificate for that website you are going to use. However, you may not access websites for various SSL errors. We know SSL certificates as such ones that can offer you the most security. It is because this is capable of encrypting data. As a result, hackers are unable to decrypt. While making customer trust, you can use SSL to keep your site secured.


Frequently Asked Questions:

  •  Why do you need an SSL certificate?

It is useful to keep user data safe, verify the ownership of the site, etc. Besides, It also helps to stop attackers from creating a fake version of the site.


  • Should all websites have SSL?

The site on which you want to use your personal information should have an SSL certificate. Without SSL, the sites will become HTTP.


  • Does Google require SSL?

It is Google who is now pushing web owners to use a certificate. If Google wants to do this, it must display only the secure sites in the search results.


read more
AppsInternetSoftwareTechnology News

Xbox Error Code: How to Troubleshoot Xbox Error Codes

Xbox Error Code: How to Troubleshoot Xbox Error Codes

Have you ever experienced an unwanted “pause” by your Xbox while you are enjoying your favorite game? Or Have you heard or seen some numbers (0x80010108) / or the so-called “Xbox Error Code” on Xbox while playing your games?

If yes, you will be annoyed to see these kinds of pauses while striving to enjoy your game. But it happens; if you haven’t faced these with your Xbox yet, then you will undoubtedly face these in the long run.

These error codes are quite common, so there is nothing to worry about. You can solve most of the Errors by troubleshooting Xbox or doing what I’m sharing in this article.

In this article, I’m going to explain all the latest Xbox error codes with code names so that you can efficiently resolve them and move ahead by enjoying your gaming experience.

Xbox Error Code: How to Fix and Troubleshoot Xbox Error Codes

Here is the complete guide to fix and troubleshoot XBox error code.

0x8b0500b6

0x87E105DC

0x87E105DC

0x87E107DF

0x8923101c

0x89231022

0x89231806

0x8b050066

0x903F9006

0x903f9008

and more?

As per Microsoft,” the real solution to these error codes is to restart your console.

  1. Press and hold the Xbox power button on the controller.
  2. Choose to turn off the console or restart the console.

If this doesn’t resolve your problem, then try connecting to a different network. It means, use Wi-Fi or Ethernet cable or so on.

0x8b0500b6 Error Code:

This error code is quite a common error code, and it mainly occurs due to the update on the Xbox console.

All these error codes can be resolved with the below steps. Let’s start with Xbox startup errors.

Troubleshoot Xbox Startup Errors:

Generally, if you see “Something went wrong Screen” with an Error Code “E” whenever you start your console, then you can go ahead with the below steps to resolve this error.

How to TroubleShoot Xbox Error Codes:

E100, E207, E204, E200 (You can try these steps for almost all the error codes)

To resolve the above error codes, please follow the below steps. If you are getting different error codes, then scroll down to other Xbox error Codes.

Step 1: Restart your Xbox Console

Firstly, use the “D-pad” and A button which is there on your controller – to select “Restart Xbox” whenever you see “Something went wrong screen or above error codes.

If this helps you resolve the issue, you should return to your home screen after Xbox restates, and it should work correctly.

In case if the above step doesn’t work, then let’s try out another step.

Step 2:  Reset your Xbox

  • If restarting doesn’t work, then you have to reset your console. You can do it from Xbox Startup Troubleshooter.
  • Use the “Dpad” + A button on your Xbox Controller and select “Troubleshoot.”
  • It opens the Xbox troubleshooter and goes with resetting.

Manual Reset:

  • To reset it manually, you have to power off your console and remove the power cord.
  • Insert the power code back in after 30-45 seconds.
  • Now, hold both the “Eject and pair button on the console” and press the “Xbox button on the console.
  • Continue holding the pair and eject buttons for 15-20 seconds.
  • You will get two “power-up” tones in a couple of seconds. Now, you can release both buttons after the second power-up tone.
  • It will take you directly to the “Xbox Startup troubleshooter.”
  1. To reset – select “Reset this Xbox.”
  2. Then select “Keep games and Apps” when prompted. This option will only reset the OS and delete corrupted data without deleting your apps and games.

If this resolves, your screen and everything works fine, and you can then it’s good you can enjoy playing or move to the next step.

Step 3: Download Offline System update file (OSU1)

If the above steps don’t work, then you have to perform a system update. For offline system update, you need

  • Windows PC – with Internet connection + USB Port.
  • NTFS formatted 6 GB Space USB drive.

 Note: Most USB flash drives come with FAT32, so you have to reformat that to NTFS. It will format all data during this process, so use an empty drive.

Process:

  • Firstly, plug your USB drive into the USB port of your Windows PC.
  • Open “Offline System Update file OSU1) – This you will find in “Xbox Site.”
  • Click on “Save” — It will save the console update in the .zip file
  • Now, unzip the file and extract it all.
  • Copy the “$Systemupdate” file from extracted zip file to your USB drive.
  • Unplug the USB drive from your computer system, and proceed to update the console.

Step 4: Update Xbox

 Now, let’s update your Xbox using “ Xbox startup troubleshooter.

  1. Power off Xbox — Unplug the power cord for 30 seconds – Press and hold “Pair & Eject.”
  2. After 15-20 seconds release it after two power-up tones.
  3. It will straightaway take you to the Xbox startup troubleshooter.

Xbox Process:

  • Plug the USB flash drive with offline system update in the “Xbox USB Port.”
  • Now, the “offline System update option will become active in troubleshooting.”
  • Use Dpad + A button and select “Offline System update” to start the process. This process takes some time, and it restarts many times.
  • When the update is completed, you will see the home screen and Xbox functioning fine without errors.

Step 5: Restore your Console to factory defaults:

If the above methods don’t work, then you can try “resetting your console to factory default settings.” This might work and resolve your error codes. However, resetting the console will lose all your saved games, settings if they are not synchronized with Xbox Live. So, this should be the last option for your issue.

  1. Open Xbox Startup troubleshooter ( Steps mentioned in above step 1 & 4)
  2. Now, select “Reset this Xbox.”
  3. After selecting that, you will get a prompt “Remove everything.”
  4. Now, select that and this will delete all the data, games, and apps.

Your Xbox should function perfectly now; if the problem persists, you should go-ahead to the service shop.

This is all about the Xbox error Codes; although there are more error codes in the Xbox for all those error codes above points will be helpful. These are official ways to solve the error codes as per Microsoft as well.


read more
AppsDo It YourselfInternetInternet SecurityTechnology News

YouTube Private Vs Unlisted- Know the Difference

YouTube Private Vs Unlisted- Know the Difference

YouTube is one of the effective social media platforms to showcase our video skills. This social media platform allows you to post different types of your favorite videos. But sometimes, you don’t want the entire world to see your videos. It is when you need to go to either the private or to the unlisted. To know the difference between YouTube Private Vs Unlisted, first determine the level of security for your videos.

It depends on you whether you limit your videos to only friends and family or the public. Wanna share links with prospective customers or your friends? We have unpacked a lot of questions in this article.

What is  YouTube Public Video?

This Public setting is built-in in YouTube for all videos. Whether you want to showcase your video to everyone and see your videos in Google search results, then it is your perfect choice.

What is YouTube Private Video?

YouTube private video is a very secure type. People whom you invite can see only your videos. Here, you can allow up to 50 people in total. You should know that this type of video is not available in video tab sections, search results, video recommendations, etc.

Besides, your invitees are unable to share it with other people. In addition, someone can’t see your video despite having your link unless they have the invite.

What is YouTube Unlisted Video?

The unlisted video setting is a cross between private and public. These appear in search results, subscriber feeds, suggestions, and user video tabs. However, in this case, people are capable of seeing and sharing your video.

It is a basic gist of private vs unlisted YouTube. We have given here advantages of these videos.

Advantages of Making Private Video:

Are your videos very personal? Do you have any secret company projects? Then, this YouTube private setting is ideal.

We have given here a few advantages.

  • Sharing Videos With Loved Ones: Do your relatives live far away? If yes, then this option will be a perfect forum to share special moments more personally.
  • Private Video Library: Everyone has some personal collections such as art, comic books, or records. These are very essential to them. Videos are also one of the important collections.
  • Storing Company Information: If you are a businessman and want to share videos with your employees, it will be a great strategy. This mode doesn’t allow your competitors to see them.
  • Saves Storage Space: People who want to store plenty of their videos should use this setting.
  • Online Video Portfolio: Wanna start up your company? Then, you can showcase your work through these videos. Here, you can present your resume and video portfolio to potential clients or employers in free storage. Nowadays, it has become very common to have an online video resume. If you’re a videographer, then this video Setting is an excellent option. Thus, you can keep unwanted comments away from appearing and stop any personal issues.

Advantages of Making Unlisted Video:

Wanna share videos with a large group? But you may not prefer your videos to appear in search results. In this case, YouTube unlisted is a perfect option.

The benefits of the unlisted videos are as follows:-

  • Perfect for Co-Worker Feedback: If your company has more than 50 employees, you should use this setting.
  • Sharing a Portfolio With Employers: You can share your video resume with over one job prospect through these videos.
  • Field Testing a Potential Public Video: It is perfect for storing reviews and positive comments from a small group. In case you find bad reviews, then enter the delete option.
  • Cleaning YouTube Page: It helps to set up your page and remove old embarrassing videos. However, by changing videos to unlisted, you are capable of deleting the visibility from your channel.
  • Availability: Whether these are on a playlist, these can appear publicly.

Advantages of Making Public Video:

  • Generally, people will prefer to subscribe to any channel if it has a significant following. For business purposes, it is perfect to have a big subscriber count.
  • It helps to generate brand awareness.
  • These can be monetized and are capable of proving to be profitable.
  • Whether your videos have good performance, then you can become famous.

Drawbacks of Public Video:

We have given here a few disadvantages of public video.

  • These attract trolls.
  • Sometimes, videos can be compromising or controversial. If it happens to you, then it can imperil your future job prospects.
  • Anyone is capable of finding videos. Therefore, if they want, they can leave an online mark even after your deletion.

How to Modify Privacy Settings:

The process of modifying privacy settings is as follows:

When you upload videos to YouTube, first, your task is to log into your YouTube account. Then, you should look for the camera icon. It is available at the top right corner.

As soon as the Upload page appears, a key will be available that you have to hit to select files. YouTube says that the video remains private till you choose to set them up.

You should follow the normal process of uploading the video. During this, in the last screen, you can see an option to change the privacy settings.

Select options just save or publish the video. Then, you can see their options—

Private, unlisted, or public with their description and details.

This social media platform comes with a Scheduled feature. It enables you to keep your videos private for a while. After that, these will get published automatically at a specific date.

How to Change Video Privacy Settings: 

For PC:

  • If you are using a computer, you should first login to YouTube Studio.
  • After that, your job is to navigate to the left menu and choose the Content option.
  • Now, you should select the video that you are willing to update. If you want to see the live uploads, choose the Live tab option.
  • Next, you have to hit the down arrow option that is available under “Visibility.” After that, select any of the options— Public, Private, or Unlisted. Save it at last.

For Android:

  • First, your job is to log in to the YouTube app available on your Android device.
  • Next, your task is to hit the Library option and then tap on the option Your videos.
  • After that, you should hit the More More option, which you prefer. Now, hit the Edit option.
  • After that, you need to hit the Privacy setting option. Select any of these options— Public, Private, and Unlisted.
  • Then, tap on the back option and hit the SAVE button available at the top.

For iPhone & iPad:

  • Log in to the app on the iPhone and iPad first.
  • Now, follow the similar method that you have done for Android.

When Should You Make Your Video Private? 

These are three famous situations when you must need a private video setting.

Only For Family Purposes:

Do you live far away from your family? Have you got a holiday to share with your family? The private setting is perfect in this case. It allows you to share high-quality videos with them easily. No people can see the clips. Besides, your family members don’t need to download the video before seeing it.

Only For Company Members: 

Generally, through videos, you can share a lot of information in the shortest time. As a result, plenty of companies and organizations benefit from the video. You can share a guide of training new members, company’s policy, or update the company’s strategies through videos.

These are especially for merely internal circulation. That’s why we consider the private mode always as the best resolution for this situation. Thus, you can reduce the chances of leaking your contents.

Helpful For Applying For Jobs Or Attracting New Clients:

A few years ago, many candidates preferred to use video resumes, and it became the trend. This quality makes them unique in the list of dozens, hundreds, or thousands of applicants. Giving your CV to the recruitment team through this mode will save their time a lot. Besides, they must be impressed by your creativity and profession.

People who will get the invitation of the uploader can see the content only. Hence, HR will see your resume. They just need to tap on the link and can see the resume without downloading anything.

Videographers can also get benefits, but they should not make all videos public. There will be an issue for the author also that is related to copyright. If you have any sensitive topic, it can cause multiple negative feedback from strangers. It is when people are willing to use private videos. As soon as you post your private video, you can share it with potential clients directly.

When Should You Make Your Video Unlisted?

This type of video is a mixture of both Public video and private video. These appear in the search result, uploader’s channel, or the subscriber newsfeed. People who have links to these videos can easily watch them. Moreover, people treat this type of video like public ones.  For instance, if the content is improper or violates the copyrighted audio and video policy, YouTube will flag your videos.

Here, we have given a few situations when you require to use Unlisted videos.

Videos Posted On Your Website:

People who are running a blog or website must use the feature. It is constructive while you are going to make your content exclusive. When you switch your videos to the unlisted ones, these become invisible on Google and YouTube. Thus, you merely have to visit the web to watch your videos. It helps to increase the traffic amount on your page significantly.

Deleting Videos from Your Channel:

Plenty of people started to use this social media platform very early. Therefore, as you grow up, some videos may seem embarrassing to you while you mature. As a result, you want to remove them immediately. When you make your videos unlisted, these become invisible on your YouTube channels. But people who have links to the video can see them.

While Doing Surveys Before Publicizing:

When you upload videos, you will be glad to see the increase in the rate of positive feedback in your video’s comment. Users can share the videos in advance to them who they want.

Besides, they can see the reaction of people while switching to the public one. Thus, when you are going to publicize, you can know the method of dealing with the feedback from your viewers professionally. In this process, viewers will get better impressions about your channel. In this process, you can share clips and music with your fans quickly.

Publish Video At A Suitable Time:

People working as social media marketers have to publish their posts at the right time. Thus only, they can get attention from the crowd. It may be a few times in a day or a few days in weeks. However, you may feel confused waiting for that time. Rather than doing this, you should upload your video in unlisted mode. Then, you can schedule your time for publicizing.

Users can get two choices to schedule time for their video. These will be directly from YouTube or any other platform for social media distribution.

Many of us are familiar with social media platforms like YouTube. But we are still aware of this feature.

When Should You Make Your Video Public?

People can see Unlisted videos & playlists and share them. You should know that these won’t appear in the Videos tab of your channel homepage. No one can see it in YouTube’s search results until anyone adds your video to a public playlist.

How to Upload an Unlisted YouTube Video:

Wanna share your video with a large group of people? Willing to deliver “early access” to your newsletter subscribers? Then, you can upload your video as unlisted. It is a handy way to share online. If you want, you can set the video to public at a later date.

Here, we have given a method of uploading an unlisted video to YouTube.

  • First, your task is to sign in to the YouTube Studio. If you want, you can set up the channel you have.
  • Now, tap on the create option that is available at the top right. Then, your job is to tap on the Upload videos option.
  • Next, you should keep your videos in the upload videos box. You can select the files also by tapping on the select files button.
  • After that, your task is to fill out the video details. Then, you can add video elements as you want.
  • Choose the option “Unlisted” after that that is available under the visibility tab.
  • Now, your job is to tap on the Save button to publish your unlisted YouTube video.
  • At last, copy the link and then share it.

How to Unlist a YouTube Video:

Wanna clean up your YouTube channel? Want to delete some videos from your channel? If it is the case, then the best option is to unlist your video. Thus, you can easily keep the external links to your channel from websites. People sharing your videos help you to grow with more engaged viewers. The reason is that your current niche-related videos are the ones only that are suggested to them.

The process of Unlisting a video on YouTube is as follows:

  • First, sign in to YouTube Studio.
  • After that, your task is to choose your preferred content from the menu available on the left.
  • Navigate to the video now that you are willing to unlist. Tap on the public/private option that you can see under the visibility column. Hence, it relies on the visibility it had before.
  • As soon as you see the list of options, you are required to choose the option “Unlisted.”
  • After that, your job is to tap on the Publish option to save your video as unlisted.

Steps:

If you want to make many videos unlisted at a time, then follow this method.

  • First, sign in to YouTube Studio.
  • Then, choose the content you want for your video from the menu on the left.
  • Now, you are required to select every video that you want to unlist from the checkbox on the left. Choose the checkbox that is available at the top. You need to use the check box to select all videos on the current screen. There are many rows 10, 30, or 50. It relies on the number of rows. As soon as you tap on the checkbox at the top, you can choose all videos. Using the “Select all” option, you can easily make it done.
  • After choosing the videos you want to unlist, your job is to select the edit dropdown menu. After that, you have to hit the option “Visibility.”
  • Choose the option “Unlisted,” which is available in the following dropdown menu.
  • Now, tap on the “Update Videos” key for saving your changes. This update may consume a couple of minutes. But it relies on the number of videos you are going to update.

How to Upload a Private YouTube Video:

Uploading videos to this platform is a simple way to share a large video file. While uploading, you should set the mode as private. You can send them to colleagues for training, to family and friends.

The process of uploading a private YouTube video is as follows:

  • First, your task is to sign into YouTube Studio. You can set up your channel also.
  • Then, tap on the option Creates that is available at the top right. Then, tap on the
  • Upload videos option.
  • Now, your job is to keep your videos in the upload videos box. If you want, you can tap on the select files key to select the files.
  • After that, you are capable of filling out the video details. However, you should know that in this case, the video elements are not available. Therefore, you should skip the step.
  • Choose the “Private” option that is available under the visibility tab.
  • Whether you are willing to share it with anyone, then do it under the share privately option. You merely need to put their Google email addresses. Then, choose the option ‘notify by email.’ When you complete saving your video file, they will get notifications.
  • At last, your task is to tap on the save option for publishing your private YouTube video.

How to Share a Private YouTube Video:

As you know the difference between YouTube private vs unlisted, now see how you share the videos.

You are required to follow step by step to know the process of sharing a private YouTube video.

Step 1. First, your task is to log into your YouTube account. After signing in, tap on the profile picture available in the right corner of the page.

Step 2. Now, your job is to select the YouTube Studio to get its interface. After that, you should click on the Videos option. Now, you can view the uploaded videos listed here, like private videos and unlisted videos.

Step 3. As soon as you find the target video, tap on the title. It will help you to view the details of the video.

Step 4. Tap on the three dots available beside the Save button. After that, your job is to choose the share Privately option from the dropdown list.

Step 5.  At last, you are required to enter the email addresses of those whom you are willing to share. Save the changes that you want to make. To do this, return to YouTube Studio. You should know that in this case, a maximum of 50 email addresses can be entered.

How to Watch Private YouTube videos:

You can watch from the received email from the uploader. Go to the email and open it. Then, you can see the iconic YouTube red box that has three white horizontal dots. As soon as you tap on the link, the YouTube video will be available in a separate window.

How to Watch Unlisted YouTube videos:

For watching these videos, you need to navigate to the mail. Tap on the link available on the received mail. If you require the link only, then copy and paste the URL. After that, you can send the mail to other people.

Ensure that you share these videos only with trustworthy people who will get benefits from them.

YouTube Unlisted VS Private:

If you have an Unlisted YouTube video, it doesn’t appear in search results such as related videos, recommendations, and Subscriber feed. No one can see it on your channel. When you upload your video, it makes a URL link. Then, it helps to change the setting as Unlisted. People who are aware of the link are capable of visiting and watching the unlisted video.

It is not mandatory to have Google accounts. Therefore, while you are willing to share the video with someone, you must send the link only. Whether your video has some sensitive information, YouTube video Private is a better option in unlisted vs Private YouTube comparison.

Private videos are quite different. These don’t appear in search results, channels, related videos, recommendations, and Subscriber feed.  Invitees are capable of seeing the videos only. People who are willing to see a private video must have an active Google account. After that, they can get the invitation from the video uploader. An uploader can allow up to 50 users to view his private content.

Which One Should You Choose:

Private ones are the most secure type. You cannot download a private video which is one of the differences in the private vs. unlisted YouTube chart.

Conclusion:

While you are on the web, protecting privacy is very essential. YouTube private and unlisted settings have a barrier from the public. Whether you want to secure your videos, then YouTube videos private is the best option. However, it does not completely depend on the level of security you want.

Frequently Asked Questions:

  •  Is unlisted safe on YouTube?

People who are larger, more security-conscious businesses and have a huge amount of sensitive info must not use Unlisted YouTube videos. The reason is that you are unable to control your intended viewer in sharing your URL with someone.

  • Can subscribers see private videos?

People who are invited by the uploader can view these videos. These are not available in any search results. As a subscriber, you won’t get any notification while a private video is uploaded.

  • Can an unlisted YouTube video be embedded?

Users can set the videos to “unlisted” rather than making them “private.” Thus, they can restrict them from showing up on your channel or any search results. However, if you have the link to the video, then you can view it. Besides, you are capable of embedding the video also on any site.


read more
AppsDo It YourselfGadgetsInternetInternet SecuritySoftwareTechnology News

How to Delete Win Log Files in windows 10

How to Delete Win Log Files in windows 10

If you are a Windows user, you will find a lot of unnecessary documents and folders available in Windows. There are plenty of hidden caches, old junks that take up space. You can delete them from your Operating System, but it may be challenging. This blog post is all about ‘How to Delete Win Log Files in windows 10’ for the File Edge Readers.

If you are willing to free up disk space, then you can remove Win log files in Windows 10. Here, we have given a lot of ways through which you can remove the log files.

What do you mean by Win Log Files in Windows 10?

Windows always store a record of the operation you are doing on it. It saves the records in the directory to its log files. We know the log files as Win log files also. Generally, the files can be found by navigating to the path – C:\Windows\System32\winevt or C:\Windows\System32\config. However, it relies on the windows version.

The files can consume huge disk space of your hard drive and may have large sizes. If you are willing to free up the disk space, it is essential to remove them from your computer or laptop.

Location in Windows 10:

Users can find these log files easily in Windows 10. But as a user, you should know the location of the event viewer default path and the event logs. If you know the location, it becomes very beneficial when you are going to resolve the problem or clear the Windows log files.

You should know that two folders are there, and it relies on the Windows version you are using.

You can go to the folder of:-

%windir%\System32\Winevt\Logs\

In case it doesn’t work, you should then navigate to the folder location given there:-

%windir%\System33\config\

You need to ensure that the %windir% you are using is the directory of your PC’s Operating System.

What Does The Event Log Store? 

Users can access the event log with the help of Windows Event Viewer. It was invented in 1993. Those who are administrators are capable of using this to view actions in five categories that are as follows: application, security, setup, System, and forwarded events.

If you cannot perform the steps completely, the error codes with recently installed updates will display. If you are an Admin, you can access installed apps, Office notifications like “Want to save your changes to x.docx?”.

This windows event log doesn’t keep too many personal details like the text from web pages or documents, mouse clicks’ records, desktop screenshots, etc. However‌, these should not fall into the wrong hands as they can use these to attack.

You should remove these log files for maintenance purposes. Thus, you can free up hard drive space. In case you find the event log cleared, it may be someone else who is hiding something. This article will let you know how to remove a Windows log file using both the Event Viewer program and an Event Viewer command in PowerShell.

How to Delete Win Log Files in windows 10:

The event log of windows is capable of offering an entire record of a user’s activity. If someone accesses the event log file, they will know about your private information. That’s why if you are willing to keep your privacy protected, you are required to remove the event log daily on your computer or laptop. Users should do this thing regularly to clear the Windows event log. Let me explain How to Delete Win Log Files in windows 10.

  1. Delete Event log:

Multiple ways are there to remove event log files with the help of the Windows native interface and a third-party tool.

  •  Removing the Event logs:

The event log may store an in-depth record of your activity on the windows. As a result, if anyone attains the log file, they may know about your activity. It is possible to remove the event log from your OS’s interface directly. Users can use the Command Prompt to remove the event log. This method of removing the event logs through the Windows native interface.

  • First of all, your task is to access the Event Viewer window. If you are willing to do, then you should open the Run prompt. After that, you should give the “eventvwr.msc” command to launch.
  • You should tap on the Windows and X buttons on the keyboard together. It will help you to get a quick access menu. Choose the option “Event Viewer,” and then you should open the Window.
  • After that, you can launch the Event Viewer interface. You are capable of accessing the event logs and editing these as per your requirements.
  • Next, you can access most logs available under the “Windows Log” section. It is available on the left panel. If you’re willing to free up any log, choose the option and then tap on that. Now, you should select the “Clear Log” option.
  • If you are willing to remove application logs, you should choose the “Application” option and tap on that. You can see there all the options. Tap on the “Clear Log” option.
  • If you are willing, you are capable of removing the Windows event log selectively. Choose the event log type by going to the left panel to clear it. After that, you can access the log you prefer to remove from the right panel. Then, you should select the “Clear Log” option from the list.
  • As soon as you choose “System” from the left panel, you must make a selection on the right side. Then, you should select the “Clear Log” action to eliminate the event log.
  • When you finish completing the selection, a pop-up message appears in front of you. It allows you to remove the logs or clear them after saving them.
  • Finally, you should make the final selection and wait for some moments. It is because Windows will remove the event log from it.

Depending on the windows version, the correct technique and interface vary. You are capable of storing the documents again after performing a recovery operation. If a user wants to permanently remove the event log files except for any recovery scope, use a third-party data eraser tool.

  • Remove Windows Event Log Entirely:

When you go through the instructions, you are capable of removing the Windows event log. If you cannot remove the files permanently, you will require a reliable data eraser tool. You can use the Data Eraser tool to delete your information completely within seconds. This tool comes with a simple-to-use interface. You can remove internet activities, system traces, and apps, event logs, etc. We have given here a few features of the tool.

  • Stellar BitRase is very useful if you are willing to delete the various types of system traces.
  • Using the tool, you are capable of freeing up unused and empty space.
  • This tool supports almost all windows versions.
  • Users can use the tool for removing internet activities, data files, app data, etc.
  • As soon as you complete the method successfully, it will offer a deletion certificate.
  • The tool features various types of algorithms that you are capable of selecting from its settings.
  • It doesn’t give any recovery scope and helps to remove your data permanently.
  • Stellar BitRase comes with a scheduler that allows you to remove your data automatically.
Steps:

1: First, your task is to download this tool on the Windows PC. After that, you are required to launch the tool.

2: Tap on the option “System Traces,” After that, you should access the significant features from the right panel.

3: You should then scroll the page down to look for the option of “Windows Event Log.”

4: Your task is to choose the option. Then, hit the “Erase Now” button for deleting the Windows event log. Thus, you are capable of erasing your event log files quickly from the Operating System.

With the help of BitRaser, you are capable of deleting the event log except for creating an issue. You merely have to tap on the option once, and the Windows event log will be removed permanently.

You are not required to wait anymore as the tool is here to help you. It helps to protect your privacy. You are capable of removing almost all system traces and Windows event logs from their interactive interface. The tool becomes useful for multiple occasions to keep your privacy protected.

  1. Using the GUI:

Users can move to the Settings of the Event Viewer GUI easily. Use GUI whether you are not willing to work with command-line tools. You need to go through the steps for launching the event viewer. It will help you to remove the event log.

  • First, your task is to navigate to a Run dialog and open it.
  • After that, you should select the option eventvwr.msc. Next, you should tap on these Ctrl + Shift + Enter buttons at the same time. You should have admin rights while launching the Event Viewer tool.
  • Then, your job is to tap on the small arrow option to expand the folders by going to the leftmost pane. You will get the option available next to the folder.
  • When you navigate to the list of entries, you should choose the entry option from the middle pane. Then, your task is to tap on the Clear Log, which you can see from the Action section in the rightmost pane.
  • The shift button can be used to choose various types of entries in the middle pane.
  • You are required to repeat all the steps for all entries. The method may look quite long, but it is very easy to navigate through.

Delete Saved Console.log:

Every console file comes with a function of recording recent activities. We don’t give importance to these because of their small size. As a result, the error remains. You should occasionally check the log files to offer the solutions.

  • First, navigate to the Event Viewer and launch it.
  • Then, your job is to go to the File option available in the menu and then move to the Options. It shows you the disk space available in the file and the area consumed by the saved files.
  • After that, you are required to tap on the Disk Cleanup option and then navigate to the Delete Files.
  • Finally, you should tap on the Exit option and then tap the OK button.
  1. Use PowerShell:

If you are willing to use a very strong command-line tool, then use it for removing the log files. You should just go through the steps that are:

  • First, your task is to navigate to the PowerShell and open it after that as an admin.
  • To do this, move to the Start menu first. If you still have not exchanged PowerShell with CMD, you must navigate to the WinX menu.
  • After that, your task is to write the command given and then hit the Enter button:

wevtutil el | Foreach-Object {wevtutil cl “$_”}

powershell_clear_all_event_logs

  • Once you write the command, it will remove almost all the event logs available in your Windows 10.
  1. Use Windows Disk Cleanup:

  • Hence, you should first tap on the option This PC. After that, you should choose the option Properties.
  • Navigate to the General tab after that and then tap on the Disk Cleanup option. As soon as you tap on the option, it will begin to calculate the volume of temporary files needed to be deleted.
  • Then, you should choose all the items, such as System archived Windows error reporting.
  • Finally, you are required to tap on the OK key.

How to Do Disk Cleanup:

Windows Update Cleanup: You should delete this as it removes the old copies of Windows Update files. Users can remove them easily, but it is essential to troubleshoot if they run into update-related issues.

Windows Upgrade Log Files: Windows keeps the data files for troubleshooting problems around installations. Whether you don’t encounter any Windows up-gradation issues, you should remove them.

Language Resource Files: Whether you have downloaded another language or keyboard layout, you can delete it.

Recycle Bin: The process of deletion is similar to the Recycle Bin. Ensure that there doesn’t exist anything inside it.

Temporary Files: Users don’t use temporary files for long periods. Therefore, deleting these won’t cause any effect.

These are the things you are capable of removing from Windows 10.

  1. The Hibernation File:

Location: C:\hiberfil.sys

This mode is similar to the sleep mode. In this case, the System stores all the openwork and saves it to the storage drive. After that, you should close the operating System. It is possible to erase the battery from the PC and keep the PC on hibernation mode. After that, you are required to begin the backup and then start from where you left off. The hibernation file consumes plenty of gigabytes, but it relies on the hard drive size.

Users can take help of the command prompt in case they don’t prefer to use hibernation and disable it. Ensure that you are not removing the hiberfil.sys only as your windows are capable of making it again.

You should then tap on the Start key or hit the Win + X buttons. After that, you are required to navigate to the resulting menu and open Windows PowerShell (Admin) window or a Command Prompt (Admin). Hence, you should write the command for turning off the hibernation:

powercfg.exe /hibernate off

It is all the things you need to do to turn off hibernation. Your windows will remove the hiberfil.sys. You should know that turning off the hibernate mode will stop the PC and won’t allow using fast startup.

  1. Windows Temp Folder:

Location: C:\Windows\Temp

These temporary files are required only when in initial use. The folders and files keep the details of the windows used at one time.

Navigate to the folder despite removing it with the help of Disk Cleanup. Then, you should erase the contents necessary. To do this, you must tap Ctrl + A buttons to choose all the options inside it. After that, you should tap on the Delete option. You can encounter some errors in your windows. Hence, you are merely required to remove everything else.

  1. The Recycle Bin:

Location: shell:RecycleBinFolder

It is a folder available below the C:\ drive. Users don’t have to access the drive. While users remove any files, Windows send them to this folder. It is storage where all the removed files are kept. When you erase them from that place, then these will be deleted permanently. If you want, you can restore the deleted files again.

The folder is available as a shortcut on the desktop of your laptop or computer. Therefore, it is simple to access. However, if you won’t find this, you should write shell:RecycleBinFolder into the navigation bar of File Explorer. After entering into the recycle bin, you can find all the things deleted instantly.

When you are going to erase them, you should tap on the individual items. Here, you should tap on the Delete option to remove them permanently. You can select the Restore option to get the file back to its real place. There are buttons available on the top of Ribbon’s Recycle Bin Tools tab. These help to clear the folder at a time and store the files again.

Tap on the Recycle Bin properties for tweaking through which the folder works. Hence, you are capable of changing the maximum bin size. If you want, you have to select the option Don’t move files to the Recycle Bin.

If you tap on the option, your Windows will skip the bin and erase items permanently. However, it is not recommended to use it to restore any file deleted mistakenly from the recycle bin. You can use the Display delete confirmation dialog, but you require an additional file to use this.

  1. Downloaded Program Files:

Location: C:\Windows\Downloaded Program Files

You may find the name of the folder a little bit confusing. The function of the folder is to hold files that Internet Explorer’s ActiveX controls and Java applets use. However, people who are using a similar feature are not required to download the file twice.

But it has become useless nowadays. You should know that ActiveX has become old & outdated technology. It is full of security holes and compatible with Internet Explorer only. It can be seen only on ancient corporate websites recently.

Generally, people are not using IE anymore. The folder containing Downloaded Program Files may be empty. You can remove the contents easily, so don’t hesitate.

  1. Rempl Folder:

Location: C:\Program Files\rempl

The folder doesn’t come in a big size. Therefore, while you see this on the Operating System, you may be surprised. It contains multiple small files. There are some Task Manager methods also connected to it.

It has a connection to Windows 10 update delivery. This folder contains “reliability improvements” that help to perform Windows 10 updates easily.

  1. Use Command Prompt:

With the help of the Windows command-line utility tool, users are capable of doing any task. We can take the help of the command prompt for removing the event viewer in Windows 10. Users can use this for removing individual log files. If necessary, you can remove the entire event log.

We have given here a few steps following which you are capable of removing all Windows log files.

  • First, your task is to navigate to the elevated command prompt and open it then. To do this, you need to navigate to the Windows search context menu. If you want, you can go to the Run dialog. Use hence Ctrl + Shift + Enter buttons to open the command prompt with the admin.
  • With the help of the change directory command, you should navigate to the event viewer default path.

cd %windir%\system32\config

  • Write this command for removing all the win log files. Then, you should hit the Enter button.

del *.log /a /s /q /f

delete_win_log_files_using_cmd

  • As soon as you do this, the .log extension files will no more available on your PC.
  1. Erase Single Log Files Taking Help of Command Line:

You can even erase the log files of individual files. Go through the commands that needed to be entered.

Step 1: Hence, your task is to move to another command prompt with admin and open it then.

Step 2: You should now list all the log files. To do this, first, you should type the command given below. After typing, you should tap on the Enter button.

.wevtutil el

Step 3: You can see there is a list available on display. People who are willing to remove the required log file need to write the following command. After that, you should hit the Enter button.

wevtutil cl <name of the log>

As soon as you do this, it will help you to remove the required log from the Event Viewer file.

  1. Create A Command File for Removing Log Files Automatically:

If you are trying the latest experimental features, it may happen that you have made plenty of win log files on the PC.in this case, you should know the process of erasing the log files in Windows 10 automatically.

Make a .cmd file to make the process automated. You should go through the steps for making this command file.

  • First, you should go to a text editor such as Notepad or MS visual code. Open it after that.
  • Then, your job is to write the code and perform copy & paste in the editor.

@echo off

FOR /F “tokens=1,2*” %%V IN (‘bcdedit’) DO SET adminTest=%%V

IF (%adminTest%)==(Access) goto noAdmin

for /F “tokens=*” %%G in (‘wevtutil.exe el’) DO (call :do_clear “%%G”)

echo.

echo Event Logs have been cleared! ^<press any key^>

goto theEnd

:do_clear

echo clearing %1

wevtutil.exe cl %1

goto :eof

:noAdmin

echo You must run this script as an Administrator!

echo ^<press any key^>

:theEnd

pause>NUL

  • Use the extension command prompt file to save the command name in any place you want.

clear_log_files_cmd_file

  • After that, your task is to run the command file as administrator. To do this, you need to select the right option from the right-click context menu.
  • Here, a command prompt window will open in front of you. Then, all the log files are removed automatically.

You should run the file as admin for removing event log files.

  1. Use CCleaner to Clear Log Files:

People who are using the drive-maintenance program CCleaner can scan the files. You are capable of removing the files except by downloading a dedicated log cleaner program. Hence, you need to open the tool as you normally do. As soon as you open the “Cleaner” menu, your job is to hit the “Windows” tab. Then, you should scroll down the page. After that, you must tap on the check box marked as the “Windows Log Files” option. Next, you should choose the option “Run Cleaner.” When the tool recognizes the system for those files you can remove, tap on the key again. It will help you to erase the Windows log files along with other chosen files. You are required to ensure the deletion of the log files, but it relies on the configuration process of the CCleaner installation.

  1. Use Third-Party App for Erasing Log Files Windows 10:

Plenty of third-party cleaner apps are there, which you can use to remove temporary files and other junk files. In this case, you are capable of using an app to erase the event log files.

Along with the most famous tool CCleaner, you can use BitRaser For File. CCleaner helps to clear up all junk files on the PC for free. BitRaser For File is a powerful file deletion software that you can use here.

How Can You View Windows Log Files?

The method of viewing the Windows log files is as follows:

First, your job is to tap on the Start button on the Taskbar of your PC.

After that, your job is to tap on the All Programs option.

Next, you should tap the Accessories menu item.

Now, you should hit the option WordPad application.

After doing this, you will see a new Wordpad window.

Hence, you should tap on the File menu option.

Then, you have to hit the option Open menu item.

Finally, your job is to move to the log file that you prefer. Then, you are required to hit the Open button.

Final Words:

In this article, you must have learned How to Delete Win Log Files in windows 10. Whether you are willing to remove log files, the methods given here are perfect. We hope you will find these easy to apply. Select any one of these first and perform after that accordingly.

Frequently Asked Questions:

  • Can you remove CBS log files?

You should first remove all existing log files in \Windows\Temp directory. After that, your task is to prevent The Windows Module Installer services. Then, you should remove the \Windows\Logs\CBS\CBS.log file. Hence, you are required to begin the Windows Module Installer service. It helps you to recreate the CBS.log.

  • Is it safe for removing the Windows upgrade log files?

If you want, you are capable of erasing the Windows Upgrade Log Files. But for this, your job is to solve the error if you cannot complete the up-gradation process successfully. When you choose the disk cleanup software, you should tap on the OK button to erase the documents. As soon as you tap on the Cleanup System Files, it will help you to erase more junk files.


  • Can you remove event log files?

Now, you are capable of removing event log files easily from your Operating System. Just take the help of online tools to remove the files and the event log without making any issues. Thus, you can remove the event log files permanently just with one tap. You only have to erase the Windows event log along with the system traces from the interface, while using online tools.

read more
GadgetsTechnology News

Sennheiser CX Plus True Wireless Earbuds

Sennheiser CX plus True Wireless Earbuds

It was not a long while ago that Sennheiser launched its first true wireless earbud. The new Sennheiser CX plus True Wireless Earbuds has been garnering much attention, and Sennheiser is aware of this. They have revealed the product to the world on September 13th, but its availability in the local stores is only from September 29th, 2021.

Sennheiser CX plus True Wireless Earbuds

What’s new in CX plus True wireless?

The stand-out feature in the new version is the Active Noise Cancellation ( ANC). ANC is still available with Sennheiser‘s flagship product, ‘ Momentum True Wireless – 2,’ but the cost is $300.00. The new product is priced at $ 179 .00 thus creating a huge gap in pricing.

The new wireless buds are available in two colors only, namely Black or white. They are slightly large compared to normal earbuds, but they snuggle into your ears quite comfortably. You cannot shake off the lightweight earbuds easily, though. They hang on tight even if you are running down a street with your head shaking all the time.

The wireless buds are secured with IPX4 technology, making them completely water-resistant and sweat generated.

The pairing between the buds and the device is accomplished via Bluetooth, and both the buds are activated simultaneously. If you still wish to know which the ‘master’ bud is, you can place it in the box and release it one by one to know that.

It has its codecs as the buds support all four of them. They are the

  • AptX
  • SBC
  • AAC
  • AptX Adaptive.

These codecs allow you to control the earbuds with the touch or tapping of your fingers. Functions get activated depending upon the one, two, or triple touch.

The EQ system can also be customized with both earbuds in either ear, functioning independently. In case you wish to hold the music, removing one bud alone can pause it. The unique feature of independent working between the two buds is an innovation over the Momentum 2, allowing only the bud on the right to work.

CX plus True Wireless Earbuds

Sennheiser claims that the battery would last a full 24 hours of usage compared to the previous CX, which lasted 27, and the Momentum 2 for 28. One can safely assume that the new features like ANC and the Transparent Hearing Mode are bound to drain it more. We have to also wait to check on the battery’s longevity in each earbud once it is released from the charging box with USB provisions. One can only wish for a wireless charging box from them in the future.

The ANC does block all the external noises, thus delivering wonderful clarity to the user’s ears.CX plus True Wireless Earbuds has another feature called the Transparent Hearing Mode, which helps you focus on all those external noises, making it a 2 in 1feature.

Conclusion:

The clarity is further enhanced in the new CX plus True Wireless Earbuds as Qualcomm Snapdragon is introduced. Sennheiser is a win-win situation even though the price is higher by $50.00, and you get most of the features available on their expensive flagship product, Momentum True Wireless 2!

read more
AppsDo It YourselfSoftwareTechnology News

Java Vs C++: Similarities and Differences

Java Vs C++: Similarities and Differences

Let us discuss Java Vs C++: Similarities and Differences in this blog post

What is Java?

Java is defined as a high-level programming language, the purpose of which is general and is designed in such a way as to curtail dependencies while remaining class-based.

Any application to be developed needs a computing platform to which it caters. Therefore the need for this language to be speedy and reliable and security features in place is imperative.

Every computing device does require its program to develop applications in it. To cite a few, it could be laptops, mobile phones, data centers, computers, supercomputers, etc. The IT industry uses this language, and it is considered an indispensable one for developing software.

It was developed at Sun Microsystems (now a part of Oracle) by James Gosling in the early 1990s.

What is C++?

Similar to Java, C++ is yet another computer language that is object-oriented but in reality an extension of the ” C’ language only. It is considered a high-level language as it has the standard features of its predecessor, ‘ C.’

This familiarity with C allows for low-level manipulation and a step closer to the primary machine language.

Bjorne Stroustrup developed the language to continue the rising trend of C languages. It does, however, usher in further control over system sources and memory.

Java Vs C++ Key Differences:

Here are a few key features in which both feature and the differences between them.

Platform

Java Platform:

The platform of this language has a suffix. It is platform-independent. In other words, all operating systems are ‘ user friendly’ with their compiled codes. The usage of the compiler has to be emphasized at this stage.

Humans write programs, and one can read those. It is known as ‘ Source Code. ‘ The compiler becomes a translator for these source codes and converts them into executable codes for machines. That language is known as Machine Language.

When there are many instructions in machine language, it has to arrange in sequence. The CPU can work on these instructions and execute them in two ways. It can carry out the work directly.

The other way is for the CPU to make an intermediate representation. Such a representation can only be understood by a virtual machine and then interpreted.

The interpretation is in Java, and it is called Java Byte Code.

Java Program Execution: The Step by Step Procedure.

  • It compiles all programs whenever written.
  • Such compilation would not be in machine Native Code. It is called the • Class file (or) bytecodes.
  • Without using an interpreter, execution on the machine is impossible, so the bytecodes are always ‘ non-executable ‘ codes.
  • JVM acts as the interpreter, and the JVM can only execute all executions of Bytecodes.
  • The desired output can only be achieved by running the final program.

C++ Platform:

  • They are not platform-independent.
  • The compiler can only generate a file in the • exe extension, which is OS-dependent.
  • It can only run on that OS from where it has been generated and not any other OS. Therefore the compatibility with other OS is redundant.

Java maintains independence across platforms, whereas JVM is 100% dependent on media. – Explained why!

Points to be noted:

  • Pointers can be used in C and achieve a call by reference
  • In C++, the choice of pointers and references (either one) for pass by.
  • As far as Java is concerned, the primitive types are always the values, and the non-primitive can only reference.

Call by Value & Call by Reference:

Call by Value:

The method or practice of attaching values to variables is known as Call by Value instead of calling it a function.

On the same note, we substitute addresses in place of values to the same function. It is known as ‘ Call by Reference.’

So, what is the difference between both?

The commonality is the function between both. Therefore, the procedure is invoked using these two methods only.

The difference between the two ways is ascertained by the value types which are passed on to them. These are called Parameters.

A function can either be given a parameter or receive them. When it is passed onto them, it is called ‘ Actual Parameters. ‘ On the other hand, when accepted, it is called ‘ Formal Parameters.

Call by Value:

To understand this better

  • The Actual Parameters are transferred to the function.
  • Now, the function has two parameters that can be stored in two memory locations independently. Due to this, if any changes occur internally inside the functions, the actual parameters would not be reflected.

Call by Reference:

They share the exact locations under this. We refer to the actual parameters and the formal parameters in which only the Actual Parameters reflect the changes inside the function.

Features:

JAVA C++
1. Many features are available and are capable of adding many more It does not have this capability and has no features that would be equivalent to many in Java.
2.
  • Packages
  • Interfaces
  • Multithreading is are certain features here.
There are no features that can complement these here. The library functions under a standard header file are the only plausible solution.
3. The main objective of multithreading is that

• It permits simultaneous execution

•Conditions are that the pieces should be from the same program

In here, one would do it only manually. No program exists for such multithreading.
4 The string is one of the built-in types in it. In some respects, this string resembles the string class type provided by C++. It is important to note that in C++, the string is available only if its class declaration is included. There is no built-in type for this.
5.


It consists of API classes that are it is own. In case the standard library of C++ exists, it would be removed.


Has only the standard library.


The C++ programming language and Java have many similarities and differences. Following are a few of the significant differences between them:

Comparison Index

C++ Java


Platform-
independent
It is entirely platform-dependent. Compiling its code on each platform is necessary. It is completely platform-independent.
Mainly used for
System programming is the primary function of this language. Application programming is its primary usage. It is to be used here, conditions are, it should be

  • Windows-based,
  • Web-based,
  • Enterprise,
  • And mobile applications.
Design Goal
It was designed for systems and application programming. It was an extension of the C programming language. Originally designed as a printing system interpreter, it later expanded to support network computing. An easy-to-use interface facilitates the use of the program by a wider audience.
Goto
It supports the goto statement, but it should be avoided as much as possible to prevent adverse effects. It does not support Goto statements as it is initially not available.
Multiple inheritances
Unlike interfaces, multiple inheritances are possible in this language. It supports many types of inheritance, including multiple and single inheritance. Even though there are issues, When numerous estates are encountered in it, the virtual keyword is used to solve the problems.  The  classes do not support multiple inheritances.
Operator Overloading
It is possible to override methods and operators in it. The excessive workload for operators The only way to overload methods in it is by using strategies. The system does not allow operator overloading.
Pointers
It is possible to use pointers in this language. You can write Pointer programs in it. Pointers are the foundation of it. We have seen in previous tutorials that C++ has strong support for pointers. Pointers are limited in this language. Java‘s internal pointer system supports pointers. It is, however, impossible to write a pointer program in it.
Compiler and Interpreter
It uses a compiler only. And, is compiled and run using the compiler, which converts source code into machine code, which is platform-dependent. It uses both compiler and interpreter. And the source code is converted into bytecode at compilation time. In addition, the interpreter executes this bytecode at runtime and produces output. This language is interpreted; that is why it is platform-independent.
Call by Value and Call by reference
It supports both

  • Call by value and
  • Call by reference.
 It supports

  • Call by value only.
Thread Support
It does not

  • Have any built-in support for threads but do rely on
  • On third-party libraries for thread support.
It has built-in thread support.
Documentation comment
It doesn’t support documentation comments. It supports documentation comment  such as /** … */ to create documentation for java source code.
Virtual Keyword
It supports virtual keywords so that we can decide whether or not to override a function. It doesn’t have the virtual keyword. By default, We can override all non-static methods. In other words, non-static methods are virtual by default.
unsigned right shift >>>
It doesn’t support >>> operator. It supports an unsigned right shift >>> operator that fills zero at the top for the negative numbers. For positive numbers, it works the same like >> operator.
Inheritance Tree
It always creates a new inheritance tree. It uses a single inheritance tree because all classes are the child of the Object class in Java. The Object class is the root of the inheritance tree in it.
Hardware
On a relative basis, it is much close to Hardware. Java and Hardware have minimal interaction.
Object-oriented
It is an object-oriented language. But in C language, a single root hierarchy cannot exist. It is also an object-oriented language. However, everything (except fundamental types) is an object in this language. It is a single root hierarchy as everything gets derived from it. Lang.Object.
Structure and Union
It supports

  • Structures and
  • Unions.
It does not

  • Support structures
  • And unions.
String
The string is one of the built-in types in Java. In some respects, this string resembles the string class type provided by C++. It is important to note that in C++, the string is available only if its class declaration is included. There is no built-in type for this.


Library
Java consists of API classes that are its own. In case the standard library of C++ exists, it would be removed.


Has only the standard library.


Memory
 

In this, compound-type objects are allocated in a typical manner in the form of a local stack bound.

The idioms are not the same used as far as resource management is concerned.

Memory is allocated by using object instantiation. In this, by initially allocating an array of bytes, arbitrary memory can be assigned.


Which one is better?

It is certainly not the easiest of answers.  In fact, there is no straightforward answer at all to point out one above the other.

The advantages and disadvantages are there with both.

System programming is excellent with C++, but that does not make Java redundant or less worthy. Java continues to prove its worth in many apps like the internet, Desktop, etc.

C++ on its own is versatile and can help even in gaming to leave alone system programming. On the other hand, Java cannot be trusted to develop low-level applications, gaming included.

The decision which is better weighs on the application which is to be developed. For this purpose, do the following.

  • Jot down the Pros and Cons of both
  • Check the compatibility and uniqueness with the application in development and decide which one suits better. Choose that one.

Which one is harder between them?

Java is simpler. It’s preferable because:

  • Syntax is easier to read comparatively
  • It is an object-oriented programming language and helpful to learn
  • Automatic garbage collection is available in it.
  • The quantum of undefined behavior is far lesser with Java which makes debugging easier.
  • It has a library that is of better standard and more extensive.
  • It does not necessitate dealing with pointers.
  • As Booleans are strictly required, the cause of concern for bendiness is removed
  • It surpasses any language in job postings
  • Billions of manufactures trust this language and run it on their devices.
  • In addition, it is racing up the popularity charts with C++ in a declining mode.
  • It has better packaging.

Besides, it does have its merits, and there are many. But Java makes things easier.

Conclusion:

Both C++ and Java are excellent object-oriented languages. C++, in addition to this, is also a procedural language.

There exists a few new features which are available in both but differ in their characteristics.

Likewise, a few features of C++ are powerful compared to Java. Such features make C++ stay in the reckoning for a long time to come.

Web-based applications would embrace Java more for features like templates, automatic garbage collection, etc.

read more
GadgetsDo It YourselfInternetTechnology News

APU vs CPU- How Do They Differ- Explained

APU vs CPU- How Do They Differ- Explained

Let us discuss APU Vs CPU in this blog post. Sometimes people get confused between them. But they are neither same nor perform similar functions.

Suppose you are going to buy a new computer or a new setup. Then one must know the difference between these. So that you can make intelligent choices while setting the pc.

Here, we will provide a complete and easy guide to know these and benefit from them. So, read the article till the end.

In this article, we put some light on these acronyms and their differences. Knowing about these will provide you an advantage and also help you in saving you precious money.

Without further due, let’s know them in-depth and have a clear picture of these units.

Firstly, before moving ahead, quickly understand the definitions.

What is a CPU?

 It stands for Central Processing Unit. We have studied about this one in our schools. It is called the mastermind or brain of the computer as it works in processing all the main functions and executing them. All information is processed here. It is a controlling chip responsible for the execution of arithmetic, logic, or other operations. Besides, it is an excellent calculator which computes and calculates in just a few seconds. Further, it is also responsible for telling other components what they are supposed to do.

It is nothing complex but a simple chip. The processing rate differs according to the clock speed, thread count, or several cores. Previously, a single-core was only able to do a single task at a time. But nowadays, 16 core CPUs are available, which has 3GHz speed that means it can perform three billion instructions per second only.

The Central processing unit has a default factory clock; It can be overclocked to perform even more instructions per second. But sometimes, due to overclocked heat, heat is generated, which is eliminated by an external third-party cooler.

What is a GPU?

 GPU stands for Graphics Processing Unit. It is crucial and responsible for rendering graphics like its name suggests, i.e., Images or videos. Also, most importantly, for gaming purposes like video games, 3D modeling, video editing, and more. If its base clock is slow, then like the CPU, it can also be overclocked.

If you are about to set up a gaming computer, GPU must comment because powerful and effective graphic cards are needed. That’s why these cards are pretty expensive. But cheap ones are also available in the market, but these are not recommended for more excellent performance in gaming.

GPU is more effective than Central Processing Unit as they process heavier loads of data in parallel. In simple words, it performs various data simultaneously and improves the performance of graphics or video.

The GPU is interfaced via PCLe ( PCI express) slot on the motherboard and via Thunderbolt 3 port, its interface with laptops or PCs.

 GPU is in two forms:

#1 Integrated Graphics

 #2 Dedicated Graphic Card

  • Dedicated Graphic Card is not a part of the motherboard, but it is a small chip that comes in different cards; and the best part is these cards are removable, and one can upgrade them. It has its RAM, which can be customized to increase performance for graphics-related processes.
  • Integrated GPU is the part of the motherboard, and it’s not removable. It doesn’t come with its dedicated RAM but uses the system RAM for operations. It means it refers to a computer where the GPU is built onto the same as the Central processing unit. So many benefits you get Inside, like Small Energy and its Efficiency. A few years ago, this Graphic had a bad reputation. But now, so many you see in recent years.

As compared to Dedicated GPU, Integrated GPU is slow.

Note: Without GPU, CPU alone is not sufficient for gaming as GPU does all the heavy lifting and renders 3d experience. Also, without a Central processing unit, GPU can’t work to a full extent. So, a combination of both is best for gaming and avoiding bottlenecking.

Therefore an average Central Processing Unit with GPU is good enough for high-level gaming purposes.

What is an APU?

 It’s an Accelerated Processing Unit. It is a combination of both CPU and GPU on a sole die. Or it can also be called a Central processing unit with an integrated chip on the motherboard.

It performs both units; it serves as the Central processing unit with the basic graphic processor.

For gaming, its performance is not as effective as dedicated ones. But it is fine for some PC and Console games. Maximum performance is not gained with this.

It is a good option for budget-friendly users. It’s a good solution for rendering graphics for Pcs and laptops. And it can be overclocked as well.

It works efficiently and has capabilities of both, and also consumes less power. But the sad part is that its performance is not strong.

There are many series of Accelerated Processing Units in the market like:

  • Its A-Series is an affordable option, but its potential is weakest.
  • The Athlon series is better than the A-series. Work performance is average.
  • And, Rayzen is strong nowadays.

At last, it’s an affordable option and power-efficient but not powerful enough for running AAA games nicely.

What makes Accelerated Processing Unit a worth buy is its low manufacturer, increased power efficiency, good performance speed, and pocket-friendly. So if you want to upgrade your PC, then go for this affordable option which falls within your budget.

APU without Dedicated Graphic Card

If your budget is tight but still wants to build gaming, then It is the ideal option. Its latest models come with quad-core processing with multi-threading and thus results in an impressive performance.

But if you need more graphical performance, then this device lacks in this regard. Also, it is an affordable option, but still, it makes you spend money on other factors.

Buy this one as per your need and preferences as it provides many benefits like dual-channel, fast-acting memory, etc.

CPU with Dedicated Graphic Card

 The Central processing unit with Dedicated Graphic Card is the best combo for best and high gaming performance. But the only thing is it is an expensive option as it increases build cost.

For a greater extent of gaming, both components are needed. Some people think that only the Central processing unit is an essential component, but one can’t enjoy many games without a dedicated graphics card. GPU offers more power as it comes with its power, cooling, and memory. It is a small chip that comes separately.

APU vs CPU- How do they differ?

With the difference between them, one can more easily get a clear picture of these acronyms. Let’s see some major factors in which they differ so that you can decide clearly which one to buy.

#1.What they process

 They sound similar, but actually, they differ in process. CPU processes all the arithmetic, calculations, and computation and lets other components do what they are supposed to do and receive and give direction to the command or data. Also, GPU handles all the graphics like directing or receiving data. Whereas Accelerated Processing Unit has both CPU and GPU work capabilities, it’s not as pro as the combo of these components.

#2.Power and Efficiency

 Many people have only knowledge about CPUs. And we suppose it is the most powerful and effective one as it is the mastermind of the computer. But I’m reality the GPU is more effective than the previous one as all the heavy and lifting tasks are done. So, GPUs are more effective and powerful than CPUs.

Talking about Accelerated Processing Unit offers high power as it combines the two of a 2 in 1 component. It is an affordable option but does not beat the performance of a dedicated CPU and GPU.

#3.Necessity

 The question must arise in your mind: what component or unit to run a computer? Or which one can single-handedly do the job?

Then the answer is GPU is not much needed for the running of the computer, or you can play some games also. But for heavy gaming and gaming to another level of experience, a graphic card is needed to provide higher-speed quality and more.

#4.Pricing

 Getting both CPU and GPU will cost more. So, considering pricing, it is an affordable option and even good to play some games. Its cost differs depending on frame rates.

Similarly, if you want a more effective and powerful for Both, you need to pay more.

Overall, the Accelerated Processing Unit is much cheaper.

CPU Vs APU- How Easy is it to Upgrade?

It’s a truth that everyone wants to hold thing’s for a long time, but We can’t ignore Updates that will Come for a lifetime. Now we need to prepare for upcoming updates. But here we’re talking about Upgrading Graphic cards that can be expensive for you. Changing a graphic card is straightforward because you need to replace the graphic card with New Version.

We all know that before the release of Ryzen, It was seriously an issue. So, overall we can say that if you want to do some upgradation, then it’s a compelling Swap Process.

If we talk about the previous years, it’s tough to do this job, but now after launching Ryzen, everything changed, and Now anyone can upgrade easily. It means a lot when we add a graphic card inside the Central processing unit, but after the Ryzen game is completely changed and it’s so easy to implement a Graphic card. And you have decision capabilities to decide whether you want to update later or not.

Conclusion:

Well, buying any processing unit depends on your needs. If you are a new baby, it’s always better to go for Accelerated Processing Unit as it’s sufficient for start and affordable. But for higher gaming needs and have enough budget, then go for both.

So as per your wallet, go for the right one which suits you. It just depends on the price and gaming needs. So decide accordingly. If you still think who wins this battle, then let me clear you – Accelerated Processing Unit is good, but it’s not for ideal gaming lovers. Still, it’s a powerful game-changer and Comes with fantastic flexibility and Time-saving.

In my choice, going for the combo as Accelerated Processing Unit will not be the right or ideal for gamers. For much better performance and experience, choose CPU and GPU.

But if you want to play games casually, then, of course, Accelerated Processing Unit is sufficient, and you can upgrade it as well.

Frequently Asked Questions:

Q.1 Is APU better than CPU & GPU?

  • Well, if you’re looking for typical computing, then you can say that the Accelerated Processing Unit is all you’re looking for. But if you’re looking for applications, then you need both because, as we noted, Two are better than one. For 3D animation or Gaming purposes, both are better options.

Q.2 What is the Most Powerful APU?

  • Without a doubt, AMD Ryzen 5 3400G is the best and most potent Accelerated Processing Unit. With this processor, you can play almost any game without any Hitches.

Q.3 Will APU replace GPU?

  • As we discussed in the Entire Article, to be summed up, we know that the Accelerated Processing Unit alone is not Fulfilled all the requirements, but Yes, we can say that It can replace GPU.

Q.4 Can an APU work with a GPU?

  • 100% Yes, It can work with GPU. Even though you should know that the GPU is compatible, it is the best point of the Accelerated Processing Unit. Well, you can start with Small and wait until you’ve something big to invest in hardware.

Q.5 How much RAM does the APU use?

  • If we talk about Its User’s they’re using Two 4GB memory modules that Come with 8 GB capacity. These are especially Value for Ryzen 3 2200G.

Q.6 Is 8GB RAM enough for a Ryzen?

  • 8GB is enough for casual games, but I suggest you go with 16GB RAM if you’re looking for intense gaming.
read more
GadgetsTechnology News

Blink Vs Arlo: Which Smart Home Security System is Best?

Blink Vs Arlo: Which Smart Home Security System is Best?

Nowadays, Arlo (by Netgear) and Blink (by Amazon)— both of these are reigning in the market as the most popular smart security camera brands. Let us discuss best  things between Blink Vs Arlo, and choose the best for our home need. When you look at the cameras of each version, you will find that the cameras of Arlo are a kind of souped-up versions of Blink cameras. Both of these brands produce high-definition, wire-free security cameras with customizable settings as well as smart specifications. However, when it comes to Arlo, you will get intelligent features a little bit more. But you need to spend more money on it. At the same time, the other one offers affordable alternatives. This article gives details about these two brands, similarities and differences between these two, etc. Let’s check it out.

What is Blink?

It is a home security brand that Amazon-owned. This brand provides affordable, and easy-to-fit both indoor and outdoor surveillance cameras.  Using motion-sensing cameras, users will be able to cover their entire home. Besides, they can access both footage or a live feed with the help of the smartphone application. You need to use regular batteries to power the cameras. It was first released as a Kickstarter project in 2016. However, compared to Blink, it provides a wide range of devices and incredible features.

On the other hand, Blink quickly grabbed the users’ minds as a go-to in the home security space. These cameras have become highly demanding due to their low costs and easy-to-set-up facility. Later, Amazon acquired this company which has headquarters in Andover, Mass. Whereas the headquarter of Arlo technology is in San Jose, Calif.

About Blink:

BlinkDo you want to install and monitor cameras yourself? Then, choose the budget-friendly cameras of this brand. Here, we have given a few advantages and drawbacks of the company. It will help you to differentiate between these two brands.

Advantages

Affordable: The latest mini camera of the brand is available at just $34.99. It is an inexpensive way of increasing the security of your home.

High-Quality Video: Along with excellent image quality, the cameras offer HD quality footage day and night.

Wireless Connectivity: You can operate the outdoor camera of this brand on a Wi-Fi system. As soon as you install the app on your smartphone, you will be able to control the specifications of your home security. Besides, you will get sound notifications and motion alerts on your phone. Now, you can easily monitor your entire home using these cameras. Moreover, with the help of these cameras, you will be able to keep your eyes on your children when you are in the office.

Long Battery Life: These cameras are available with rechargeable batteries. These batteries can last up to two years.

Disadvantages:

Limited Storage Options: The brand offers two primary cameras: the XT2 indoor/outdoor security camera and the Indoor camera. In both of these cases, you will not get any extra storage except the free two hours. However, the new Mini camera needs one of two subscription storage plans for storing footage. These plans are – Basic Plan and Plus Plan. The Basic Plan runs $3/month or $30/year. The other one, Plus Plan, runs $10/month or $100/year. In both cases, you can get 60 days of rolling video storage. This basic Plan is compatible with one Mini camera. At the same time, the Plus plan is consistent with an unlimited number of Mini cameras.

Few equipment Choices: It has launched the latest version of the Mini camera.  However, users still will not be able to get good equipment options.

No Professional Monitoring Choices: It doesn’t offer any professional monitoring option to the customers. All responsibility for monitoring depends on the user.

What is Arlo?

It is an old player who Netgear establishes in the smart home niche. Besides, It is famous for its feature-packed smart home security devices. It comes with a motion-sensing camera system that you can install with ease. The company headquarters is in San Jose, Calif. It was established in 2014 and is a part of Netgear. Later in 2018, it got separated from Netgear. In this article, we are going to discuss Blink vs Arlo in detail. Let’s check it out.

Arlo

About Arlo:

You can get budget-friendly products from this brand also. If you can install and monitor your cameras yourself, then go for this brand. However, you can get multiple models and storage plans. These features make the brand an ideal choice. However, there are some disadvantages of this brand also that you need to consider.

Advantages:

High-quality images: Cameras like the pro and the ultra version come with HD video and night vision. Besides, a few cameras feature color night vision. It enables the user to see what is happening inside your home day and night.

Camera Security: It doesn’t matter whether you need 1, 10, or 20 cameras; you can monitor every corner of your home with the help of a smart integration system. You can get high-quality Resolution while monitoring that makes the brand exceptional. Besides, the cameras support the SmartThings hub app. Therefore, you can monitor your home using the cameras in real-time.

911 Emergency Features: Now, you can dial 911 directly with the help of its storage plans. You can call this number if you see anything suspicious on the live feed of the camera.

Storage Plan Options: These cameras allow you to store up to seven days of footage. You don’t need to pay for this. However, for saving footage to the cloud storage for more days, there are some plans. In these plans, you can get additional smart features. You can get

Data storage for thirty days is available in both Premier and Elite plans. Besides, these offer motion detection in selected zones, more advanced alerts, along the 911 emergency feature. In the Elite Plan, you will get higher resolution video quality, i.e. 4k video resolution.

The cost is $4.99/month for each camera. For up to five cameras, the price becomes $14.99/month. On the other hand, the premier plan comes with a $2.99/month cost per camera. For this case, the price is $9.99/month for up to 5 cameras.

The Array of Product Offerings:

When you choose home security products, you find multiple different choices. Examples of the options you get are as follows:- indoor and outdoor cameras, a baby monitor, doorbells, security lights, etc. 

Disadvantages:

No Professional Monitoring: You can’t get any professional monitoring options here. Compared to professional monitoring, self-monitoring is relatively less costly. Trained professionals can help you in this case.

Mediocre Battery Life: You may need to change the battery more frequently than other brands in this case.

Blink vs Arlo:

Price of Blink:

When it comes to Blink, the cost of a single indoor camera system is £79.99/$79.99. It is around AU$145. If you want, you can add extra cameras for the price of £69.99/$69.99. The cost of each camera will be around AU$125. However, you can purchase a five-camera system at a £289.99/$279.99 price point. Blink XT2  comes with a weatherproof design. The price of each camera system is £99.99/$99.99, which is around AU$180. You can get extra cameras also if necessary, which are available at £89.99/$89.99 each. The price is around AU$165. The brand offers you a five-camera system which is available for £399.99/$379.99.

It is around AU$725. You need to know that the XT2 version replaced the standard XT in the United States. Both of these versions are pretty similar, but you will get some additional benefits in the XT2. It offers two-way audio and better battery life. The Mini version costs $34.99, whereas the indoor camera’s price is  $79.99. Besides, the outdoor version of the camera is $99.99. These cameras contain a wireless hub that is known as Sync Module. You can add up to ten cameras in every module. In this case, you don’t need to pay any monthly fee.

Price of Arlo:

If it comes to Arlo, you can get a single camera system at £129/ $124/ AU$287 price. You can buy low-cost entry-level cameras of this brand for both inside and outside usages. If you want to add additional cameras, then pay $74 / £80. The brand offers a three-camera kit of a basic entry-level camera. It costs £278.99/$199, which is around AU$500).

However, Cameras of higher quality and pro versions are equipped with extra features and are very expensive. These also provide security lights, doorbells, a special baby monitoring camera, etc. This brand offers a wireless base station. It helps to keep your cameras connected. The basic Plan of the brand is free. You can use the free Plan, but it merely connects up to 5 cameras. This brand offers multiple choices.

These are Arlo Q, Baby, Go, Essential, Pro 2, Pro 3, Pro 3 Floodlight, Ultra 2, etc. The price of these cameras are $79.99, $185.77, $429.99, $128.00, $199.99, $369.99, $227.99, and $499.99 respectively. You can connect up to 15 cameras at a time using the base station. For this, you need to get a Premier subscription, i.e., £6.49/$9.99/AU$12.99 per month.

Getting an Elite subscription can also make your job done that needs £9.99/$14.99/AU$18.99 per month. This subscription is for up to 20 cameras. When you get the subscriptions, you will get additional features. However, those who have only one camera can get the basic smart Plan. In this Plan, you can get additional features. For this, you need to pay £1.99/$2.99/AU$3.99 per month.

Cloud Storage Subscription:

Do you want to use cloud storage for the cameras of the Arlo brand? Then, you have to get a subscription to a monthly Smart Plan. It allows you to get access to all the most innovative features, such as object detection.

You need to subscribe to the Smart Elite Plan to get the 4K resolution for your cameras.

On the other hand, you need to pay $3 every month for a single camera for 60 days.

The price of the cloud storage subscription of this brand starts at the same price as the other one. People who have many cameras need to pay  $10 per month to get access to unlimited cameras in the same location.

For more than five cameras, you should choose the subscription plan of this brand. However, compared to the other one, you won’t get smart features. It comes with a Basic and Plus plan. The first one can support one camera at a time which is $2.99/mo. OR $30/year. You can choose the other Plan also as it supports unlimited cameras. It is available for sixty days and costs $10/mo. OR $100/year.

 Types of Camera and Equipment:

Blink tries to offer simple indoor and outdoor cameras as well as other optional accessories. On the other hand, the other one comes with a range of various cameras.

The indoor cameras from the brand blink are equipped with motion and temperature sensors. Moreover, these models come with built-in microphones.

Besides, it enables the user to record HD video at 720p. The cameras feature outdoor, XT camera, infrared night vision, weatherproof (IP65) quality, etc. You can now easily record HD video at up to 1080p. However, by default, it records at 720p. The XT2 version offers two-way audio. It helps the user to communicate with other people.

The cameras contain two AA lithium batteries. These batteries come with estimated two-year battery life.

When it comes to the Netgear Arlo cameras, you can also find motion sensors that are considered ‘weatherproof.’ It features infrared night vision and records HD video at 720p. Every camera of the brand comes with 4 Lithium CR123 batteries. The Pro version of the tool features two-way audio, a 100-decibel siren, a wider viewing angle, USB drive support for local backups, along a rechargeable battery. It comes with a plug-in option also. The Pro version’s price of a single camera system is £239.99/$249.99/AU439, which is very expensive. The latest Ultra version of this brand offers 4K recording, enhanced night vision, zooming, tracking, etc. You need to pay £449.99/$399.99/AU$449 to get a single-camera option.

Arlo Vs Blink Home Automation:

First one comes with multiple smart home integrations. What makes this brand’s cameras exceptional is that they integrate with Apple HomeKit. These can also be connected with smart speaker standards Alexa and Google.

On the other hand, Second one contains its Home Monitoring app where you can get customizable settings. However, it comes with a limited third-party smart home integration. In this case, the cameras are not compatible with Google or Apple HomeKit, or SmartThings. These support Alexa and IFTTT.

Installation:

Cameras of both brands come with an easy installation process.  It is because both of these brands produce wire-free cameras. You only need to download the required app. Then, you have to sync the cameras using the hub. After that, you can put these at any place you want.

People who don’t need battery-powered cameras can also choose the hard-wired models of these two brands. These can connect with Wi-Fi easily. That’s why these are still known as “wireless.” You can get power cords available in these wireless cameras. Before using these, you need to plug them into the wall.

Blink Vs Arlo: Smart Home Features:

As Amazon set up Blink, it supports Alexa. It indicates that the users will get the advantage of producing rules for hooking their smart home devices together.

Arlo supports Alexa, Google Home, and Samsung SmartThings. Therefore, you will get more versatile options and choices. As a result, you can integrate your security camera system even more efficiently. It provides its own Security Light and doorbell. You can use them within a specified security network.

App Features:

For Android or iOS, you need the Blink Home Monitor app while using this brand. You can customize your camera settings using the application. Therefore, the sensitivity of the motion sensor can be determined easily. You need to select the clip length before recording and set them up as default. It notifies you every time motion is detected. Therefore, you can easily see the video clip anytime on your smartphone. It also enables you to select to tune in to the live feed.

However, users will not be able to record live watching videos. After every one minute, it throws up a prompt to confirm whether the user is watching the live video or not. You can record a maximum clip of sixty seconds. It offers a total of 7200 seconds of video storage space. If the storage becomes full, the new videos will take place at the old one’s location.

When it comes to Arlo, you need the app of this brand for both Android or iOS. With its help, you can check the battery level, change video settings, and set up notifications. It also enables you to review your recorded clips. You can choose the free basic Plan. It offers you seven days of cloud recordings, but the storage size is merely 1 GB.

To get the smart features of the brand, you need to select the subscription plans. For example, you can get features like more sophisticated alerts, person, package, vehicle, animal detection, etc. This brand also allows you to set the specific zones where you don’t want to see them. In the Premier plan, you can get a 30-day cloud recording feature. On the other hand, the Elite Plan lasts up to sixty days.

Emergency Connections

You can connect cameras of Arlo with the SmartThings hub, Wi-Fi, or cellular connectivity. The other one relies on a Wi-Fi connection.

Setup & Usability:

The setup process of these two is similar. Here, we have given the steps that you need to follow to set up the cameras.

First of all, you have to unbox the camera.

Then, connect it with the Wi-Fi network you have.

After that, you have to install the app on your phone. Then, pair both these two with each other.

Next, you need to install them in the place you want.

You can find a Sync Module that is available with the Blink cam. It works similarly to a bit of mini-hub. The module has a connection to the Wi-Fi network. It ensures that the camera can communicate with the application.

Power Consumption:

Whereas the XT2 comes with two non-rechargeable AA lithium batteries, the Arlo ultra is equipped with only a single rechargeable battery. The brand contains a magnetic charging cable that helps to charge quickly.

Both brands offer decent video streaming features. It allows the user to stream on-demand line footage directly to your phone. Compared to the Blink cameras, the Arlo ones are pretty efficient. It permits the user to share and record the live streaming from the mobile application with ease.

Night Vision:

Cameras of both brands come with infrared night vision LEDs. It is one of the most necessary specifications. The normal human eye is unable to detect infrared LEDs. The difference between Blink vs Arlo is that the Arlo Ultra cameras feature color night vision rather than using black and white images.

You can set the activity zone using these cameras. With the help of this feature, you can focus on hotspot areas. It helps to decrease false notifications when it detects the motion inside the activity zone.

When it comes to automatic tracking, the Arlo ultra version leads the race. It can zoom in, focus, and track moving items with ease. The cameras of the brand come with a bright spotlight. These spotlights get activated as soon as the camera detects any movement. You can activate a siren on your mobile app using it as a remote.

Two-Way Audio

This two-way built-in audio recording feature is available in both outdoor security cameras. With the help of this, you can talk to your visitors. However, you will not be able to use this feature in the XT2 version. It is because the maximum video footage range of the camera is only 60 seconds. Besides, the app receives push notifications when the recording is finished.

Input Connections:

The backside of the Blink cameras features the same connections. The indoor and XT2 versions come with a spot that helps to connect to the mount. Besides, the indoor camera comes with a micro USB port on its backside. However, you can’t get it available in the XT2 version. The camera uses the USB input, which is available in the Sync Module, for pairing with the Sync.

The Arlo cameras come in two inputs— a magnetic disk and a threaded insert. The first one helps connect the charging cable, whereas the other can screw in a hardware mount.

Video Storage:

Cameras of both these brands offer Cloud-based storage to store videos. The extra benefit you can get from Arlo is the local storage. It allows you to use the storage while pairing it with an SD card.

Blink offers up to 120 minutes of free video storage facility. However, it doesn’t provide any subscription option for additional storage or local backup. The other one offers the users a free storage plan for up to seven days of video storage.

You need to know that the Ultra and Pro 3 versions of the other one are not offering the feature. The Smart version comes with an Elite plan that costs $6 per month. In this Plan, you can get 30-day video history, rolling, etc. The same feature is available in the Smart Premier version, which is available at $12 / mo. This brand wins the race ultimately while comparing video storage. To get additional storage, you can choose the paid subscriptions.

Video Quality

If you are comparing these two based on video quality, then you must go ahead with Arlo. It offers more contrast, whereas the other one features a black and white night mode. If you want to get the best picture quality, you must buy the Ultra and the Pro 3 version. Each version of this brand offers indoor/outdoor cameras with color night mode, digital zoom, along very crisp picture quality. You won’t get any 4K video resolution camera from the other one. If you are looking for cameras with 1080p Resolution, go with the Blink XT2 and the Arlo Pro 2. Each of these two offers strong indoor/outdoor cams as well as excellent picture quality.

Mounting Styles:

Cameras of Blink come with a flat bottom and wireless power. Therefore, users can keep it on any type of flat surface. The product comes with a surface mount. It helps to mount the camera to a wall.

A few different types of the mount are available in this case. You need to attach the suitable base of this 2-piece system to a vertical substrate. Use two screws to get the job done. There is a secondary arm at the back part of the camera, along with a ball socket. This socket is connected to the rigid base.

When it comes to Arlo, you can find three various types of mounting styles. Compared to the other one, you can keep it freestanding on its base. If you want, you can use the mounts for mounting it on a wall.

Mount 1— Total Round: This mount comes with a flat disc back with a rounded circle portion. The back of the disk can be attached magnetically to the camera. You can get this style of mount available in the Pro and Pro 2 versions.

Mount 2— Corner Round: The primary purpose of designing these cameras is to mount them on the CORNER side. As a result, the camera can pivot easily.

In the Ultra and the Pro 3 versions, you can get this style mount. It is the wire indoor Arlo Q security camera that doesn’t come in a magnetic mount design.

Mount 3Hardware Mount: There is a hardware mount that you can use with the Arlo cameras. This kind of mount is available, especially on the Arlo Q camera. It also supports the Pro, Pro 2, Go, as well as light versions.

Similarities: Blink Vs Arlo

When it comes to home security systems, these two brands are very famous. However, you may find similarities in the functions of both of these cameras. Let’s have a look at the similarities between these two brands.

Wireless:

Nowadays, Wireless connectivity is becoming a trend. That’s why both these brands produce wireless devices. Therefore, these devices don’t require the help of chords for installation, operation, and charging.

Easy to Install:

For installing this, there is no need to use chords. As a result, it is easy for the users to install the devices of both brands. Without the assistance of any professional, you can fix the whole thing. Just go through the manual adequately given with the package before installation.

Compatible with Alexa:

Cameras of both brands support Alexa that is the virtual assistant AI technology. Besides, these devices are compatible with mobile apps. Therefore, you can easily control your home security. However, cameras of Blink are not compatible with Google Assistant.

Both Indoor and Outdoor Options:

Do you want to have strict surveillance inside and outside your home? If yes, then choose any of these two home security brand cameras. These can make your job done smartly.

HD Video Quality:

The overall camera quality depends on this factor to a great extent. Cameras of both brands come with high-resolution video recordings. You can get 1080p Resolution while choosing the Blink cameras. The other one offers both 720p as well as HD resolutions.

Quality Images:

You can get high-quality images when using cameras of these two brands. These cameras feature HD-quality video along with night vision features.

Affordability:

These two brand cameras provide you budget-friendly camera options. However, Blink is the one that gives you more reasonable choices. While buying many cameras at one time, both brands offer you exciting discounts.

Self-Monitoring Only:

These two brands don’t offer professional monitoring. You need to monitor yourself whether you are willing to buy any of these two.

No Contracts: 

There is no necessity to sign an agreement before using the cameras of the two brands. Just pay the money, and the job is done. The extra money that you may need to pay is for an optional upgraded storage plan.

Blink Vs Arlo: Which One is Right for You?

Blink offers a budget-friendly camera system that is equipped with superior batteries. This feature makes the brand unique to those customers who are looking for especially home security cameras. As a homeowner, you can easily install both of these two cameras. However, Arlo is more sophisticated than others. It offers a wide range of devices, software smarts, and greater smart home integration. To get all the benefits of this brand, you have to get a monthly subscription. It is ideal for those who want to buy a camera of a broader range of control. 

Final Thoughts:

These two brands usually come with distinct features. However, both of these can keep your home secure from thieves. In today’s world, having a robust monitoring system is very important in the home. This article has gathered all the essential information to let you know about the difference between them. Check out the entire article properly and pick the best security camera.

Frequently asked questions: 

  • Can Blink continuously record?

No. These cameras are unable to record continuously. However, if you want, you can leave it armed for some time. 

  • Can Blink cameras be hacked?

Similar to most wireless technology, these cameras are susceptible to hacking. However, Amazon recently offers firmware updates. It will help you to keep the devices protected and secured.

  • Can Arlo cameras be hacked?

Yes, there are hacking risks. The Pro 2 version of the brand is one of the wire-free cameras that requires a base station for operating. This model uses the home’s Wi-Fi network to function. In case your home Wi-Fi network is hacked, the camera will also get hacked.

  • Can you use Blink without a subscription?

Yes, you can use it without a subscription plan or free trial. The system will be able to send merely motion alerts.

  • Do Blink cameras record without Wi-Fi?

You can’t operate these cameras without an active Wi-Fi connection or having an online Sync Module. If you don’t have an internet connection, then it will turn into offline mode.

read more
InternetTechnology News

DLNA- Digital Living Network Alliance

DLNA- Digital Living Network Alliance

What is DLNA? It also Known as the “Digital Living Network Alliance,” is an certificate issuing Organisation. Many Organisations like electronic manufacturers build Devices with this enabling Features in their devices, so it’s easy to share Media over a Home/Office Network.

These enabled devices to help you share Media from one another device like you can Stream any film from your Laptop to your Android TV, Play Songs to another device using a wifi System, and, the Best example, Print a photo from your home printer Digitally.

This Media Sharing, Streaming all happens because of Digital Living Network Alliance enabled devices. A New term coming is “Smart Home”. We are all familiar with this; Smart home is Connected with all Digital devices through wi-fi Network and Control through your Smartphones. These enabled devices are specially built for this sharing purpose, so don’t think that any device can have features of Digital Living Network Alliance.

Why Digital Living Network Alliance is Needed?

It works as a Bridge between all digital devices that can operate online. And we’re using this Features daily through the printer and Streaming Movies from Laptop to TV, Playing Songs and controlling home Gadgets through wifi. This feature Enabled device makes our life more Easier and Faster. Digital Living Network Alliance helps to Connect all devices digitally and Sharing Media’s, and the best part is, We love to use these Streaming Features.

How it Employed Plug and Play Devices Use?

To use this feature, you need DLNA Enabled devices connected with the same wi-fi network as your Laptop, and Smart TV must be connected with the same wifi network. Just open both device settings and see a wi-fi option; click with your wi-fi network by filling in a wi-fi password. Now you’ve to go to Cast screen features added in Both devices. Just open it and Enable both devices and pair them together. Now you’re ready to share your Media, Movies quickly by using the Plug and Play Feature.

How Does It Work?

Mainly You see two types of devices, one DLNA Server and Another its Clients. For Streaming or sharing, you need both devices together.

It’s a Server such as Pc/Laptop, a device that shares data to another device or gives commands to another device. In PC, it has an in-built server in the operating system that easily pairs with another device.

Its Client is a Device that receives orders and Media or Content shared by a server run in this Device. These devices such as TV, Soundbars, and many devices that take command and run accordingly. If your laptop Streaming Movies to your TV, its job is to show that Content online.

That’s the complete process of Working in between two Digital Living Network Alliance Devices for streaming and sharing Content.

DLNA Protocol

It’s a Very simple Protocol, similar to DHCP. This protocol Enables your Devices like laptops and TVs to obtain an IP address and connect with networks. They used Internet Protocol (IP). All these devices must be connected with Networks like wifi Networks, Ethernet Cable connection, HD-PLC, and Bluetooth. So, after the connection between these devices, you can share media easily.

These devices support media formats like JPEG, GIF, PNG, MPEG-2, MP3, MP4, WMA. Media can be shared between these devices easily.

DLNA Android

Inside android phones, we’ve two options – Act as Server (Digital Media Player) or Act as Client (Digital media Controller). We already know the process of Client and Servers to send the Media content and another to receive it and show it.

After android updates, Our android phones have so much potential that Digital Living Network Alliance can do. Technology replaces Digital Living Network Alliance Streaming with Android phone streaming. In today’s Era, Smartphones like HTC, Samsung use wifi networks to Share their Data More Faster Way. That’s why Companies make millions of this feature enable devices yearly.

How to Use and Enable Devices?

Before using it, you need to figure out which Device you will use as Server and Another as a client. Let’s use Android TV as Server and Your Smartphone as a Client. This Feature uses this Feature to Share Media content, stream easily on the big screen, and share data faster through wifi. This Feature is used to control digital gadgets like Some electronic items you can manage through your Smartphones or Best purpose of thiS Feature is to Share your Media with other Devices. Now let’s go to the Step you should follow to Enable and Use this Feature in your devices:

Steps:

  • First, You need to connect both your TV and Smartphone with the Same wifi Network. Just open your wifi settings and fill in password details (or In TV, you can also Use LAN cable connection with Router)
  • Now it’s time to open Enable that Feature for sharing media. You can download an application on your Device (In case you don’t have that Feature). Go and download the “BubbleUPnp” application from the Google play store and check if it’s pre-installed on your device.
  • After Installing or open that Feature, it’s time to select a (server) device through your Smartphones where you want to share your media or Content. In your Smartphone, you’ll see your TV Name if you’re connected with a similar wifi network, then Pair your Smartphone with a TV, and Now you’re open for Streaming.
  • Once you paired your Device now, you can share any media content like videos, audio, images any file formats supported. On your Smartphone, you can select the file you want to share or stream and See the Magic Happen! Your Content will showcase on your TV screen. Enjoy your shows and songs easily with this Wireless connection Feature. Most of the User uses this Feature to share images, see movies and Web series on the big screen, play music, and Play Games on a large screen.

Just follow these steps. You’ll love to use this Feature. It’s Easy to Use this Feature on your Devices.

What is Digital Living Network Alliance Streaming?

Yes, this feature is mainly for Streaming purposes. We all love watching movies and Web series on the Large screen and converting this Wish into Reality. This Feature helps you. With this feature, you can stream your Mobile Content like movies into Big Screen like Android TV and Laptop easily in seconds. To make this reality, you need two devices, one for sharing Content you want to stream and another for display content you’re sharing means.

(Smartphone and TV or Laptop) for streaming purposes. When you’ve both devices, it’s time to connect both devices with the Same wifi Network. Then Enable features in both devices and pair them together. Now you’re able to share your media or Stream movies easily on Big Screen.

This is a Powerful and Amazing way to Share and Stream your digital Content from one Device to another in a few seconds over the same wifi network. With this feature, you can easily share audio, video, images, docs to another device with the same network in a very fast way. We all use this Technology to Transfer data from one device to another and Enjoy streaming movies on Big Screen.

DLNA Roku

Roku is a Media Streaming application; this application can access Digital Living Network Alliance Media Server called Roku media player. With this media player, you can see your data like videos, images and listen to Music by using the Roku Device USB port or access it through a media server.

With this Roku Media Player, you can play your Songs or access your media content easily. You need to link this media player with a Digital Living Network Alliance server (A device that has your Content you want to access), and that’s it. After Linking this player with the Server, you can access your media content easily.

It’s an amazing application, “Roku”, for Streaming services. If you like to watch movies and Shows on Big Screen, this application will be your first preference. With this application, you can stream your Content on Big Screen. Roku media player is pre-installed in some devices because it’s best for streaming purposes and Supports most of the File Formats like JPEG, PNG, GIF, RPM, MP4, AVC/H WMA, AAC, DTS and many more to make sure your streaming work without any error.

Chromecast DLNA

Chromecast doesn’t support this Feature because Chromecast Doesn’t have both devices, not as Server & Client. But still, if you think that Chromecast works with the wifi Sharing feature, the reason behind this Feature in Chromecast is that it is a third-party application. If you’re using the third-party application in Chromecast, you can easily stream and share media files. For streaming purposes, we mainly use Netflix and Amazon Prime. Still, for Streaming, you need an application on your Smartphone and your Smart TV. Only you can stream your favourite Content on Big Screen.

Apple DLNA Media Server

Over billions of Certified devices available in the market but not in the iPhone. iPhone doesn’t support this feature in their devices. Having this Feature is beneficial, and in today’s technology, most of the products have this Feature to connect digitally, either its Audio, Video System, digital cameras, and Players. This Feature is used in all devices. Most of the devices used this Feature like Computer, Smartphones, Printers, Projector, Set-up boxes. But not in iPhone, because they used their technology.

Suppose you’ve any iPhone device or any System. In that case, you’ll see they’re AirPlay-Certified Hardware because Apple uses its own Airplay System for Streaming purposes from one iPhone device to another iPhone device. However, through a third-party application, you can Stream between android and iPhone easily.

Some applications you can use in iPhone best for Streaming and Sharing purpose, i.e., Onkyo Remote 2. This application has all the essential features you’ll need in the Digital Living Network Alliance function. With Apple Airplay Streaming, it’s easier to connect devices and share media content.

AirPlay and Digital Living Network Alliance are two rivals that work with millions of Devices. But Airplay only works with Apple device’s, and Another one is open for all Devices. Even apple support only Apple devices, you can use some third party application and use apple streaming and sharing features with Android phones too.

Windows DLNA

Windows already has this feature enabled in their operating system. You can use it to build as a Server or as a Client for sharing and streaming. If this feature does not allow on your PC, then follow these steps and Enable this Feature on your PC:

  • Go to the control panel, and search “Media Streaming Option” you’ll see this option inside the Network and Sharing Center.
  • Now, click the “Turn on media streaming” option to Enable this Feature on your Pc.
  • After enabling this option, you’ll redirect to another option. First, you should Name your network you want to connect as a Client.

Your Feature is Enable in your Operating system and ready to stream and share media between devices over a similar wifi network.

Digital Living Network Alliance Certification

This Certificate is always in demand for Electronic manufacturers, vendors, and Software developers. All devices built with these manufacturers must be certified. Because this is not a Mark, It’s proof that your Device has all the necessary features with Guidelines.

These devices. Follow the Guidelines and Working perfect while sharing content from one enabled Device to another over the same wifi network. Most companies create Certified devices like Sony – Make Disc player, Television, Smartphones, computers, tablets, and many more following guidelines and well-Certified Devices.

Its Certification means it will work. There are millions and billions of devices with this certification. And each Device must be checked properly whether they follow all the Guidelines or not. After certifications, these devices come into the Market for General purpose. After certifications, these devices are ready for Share and Streaming Media Content. You can also check whether your devices are Certified or not by checking their hardware with a mark of Certified.

Why is DLNA on its Way Out?

We already have so many features that enable Devices like Windows media player, Xbox 360, PlayStation. Commonly you’re using this feature in your devices.

Well, this is on its way out. Sony founded this Feature, yes you see this Feature in PlayStation, but in PS4 & Xbox one, it doesn’t support this feature. Apple never uses this feature in their devices until you use third-party applications.

This Feature is built to connect Devices and share media from one another device through this Feature. And it’s a great idea because now we’re using this feature regularly.

Difference Between DLNA AND UPnP

Sometimes, you are also confused between these two. But finally, after reading this, your all Doubts will be cleared. You can say that Digital Living Network Alliance helps to Extend UPnP by Specifying, Protecting Content, Managing system and media Formats. In Simple Words, UPnP defined a way where devices discover, link and Showcase. Then its uses SSDP, UPnP protocol for better Search and Connecting devices like TV, DVD, Media Player, Game console all Devices that support this feature. Overall, Digital Living Network Alliance extends UPnP for better connectivity in between devices.

Digital Living Network Alliance derived from UPnP, especially for Media Streaming and sharing. The main difference you’ll see between these two is, Scope they cover. If we talk about UPnP, allow Devices to discover each other and another side; its derived version cover broad Scope because it includes media formats, content management and System protection.


Digital Living Network Alliance

UPnP

  •  It’s Mature
  •  Networking protocols
  •  Multiple devices supported
  •  General purpose


  • Very young
  • Device standard
  • Have limitations
  • Specific purpose


read more
Technology News

Google Earth vs Google Maps- Know the Differences

Google Earth vs Google Maps- Know the Differences

In earlier days, people used paper roadmaps to find directions for long trips. But Google Earth has changed the way of searching for any direction after its release in the year 2001. Now, we can see the location of the places before we started traveling. It helps us from getting misguided by the wrong directions. It was known as Earth Viewer 3D. A CIA-funded company named Keyhole, Inc innovated it. Google acquired it in 2004. In this article, we will discuss the topic of Google Earth vs Google Maps.

However, these two web applications are completely different. But the main purpose of these apps is to explore the world. In the year 2005, Where two technologies turned the desktop-based map of google into a web application.

What is Google Maps?

If you want to see your destination whenever you want, then Google maps can help you in this case. According to Wikipedia, this digital map service is a web mapping service. It enables users to get images of satellites, road maps, aerial photography, etc. Moreover, this app lets you know about the traffic conditions each time.

Using this app, you can learn about route planning, such as by which transport you will be able to reach the place by car, foot, bicycle, or public transportation, where 2 Technologies used this web app as a C++ desktop program earlier. Later they convert it into a web application. This app was launched in February 2005.

maps

According to the Daily Express, it is a fundamental navigational app that lets you know about the easiest and fastest route to go from one place to another. If you want to find any place where it is, this web app is a perfect choice.

Each detail you can get from this app is up-to-date. Google Maps’ GPS is beneficial in this case, as it guides you properly by giving the right directions. That’s why if you want to make a trip to Paris or any other place, then it is a good option.

Advantages:

  • It helps the users by giving images street by street.

Disadvantages:

  • The graphics of this app are not so detailed.

What is Google Earth?

Google Earth that was released in 2001 is a 3D representative of Earth. It shows the directions with satellite images’ help, aerial photography to give the proper direction of any place. Besides, this program can allow you to watch different locations from different angles. Even, you can explore the world only by putting addresses in the app. Users can download this app on their smartphone or tablet.

According to the Daily Express, this app is made especially for explorers. If you want to know about the place before traveling, it is a nice one to select. This app is not designed in a way so that you can navigate anywhere. But, it assists you to search for local landmarks before your arrival. It is an ideal web app to get an excellent view of the entire world.

Advantages:

  • You can get high-resolution images, detailed maps of any street, any business address, etc.
  • As well as this app offers the users to get Geospatial data, 3D cityscapes, panoramic pictures at street level, historical Imageries.
  • It also allows you to know about the weather details.

Disadvantages:

  • You are unable to use this app without accessing the network. Moreover, it needs a fast connection.

Google Earth vs Google Maps- What are the differences

Let’s have a look at the comparison of these two web apps.

1. Google Maps assists in finding out the local landmarks and share your location.

This web app is popular due to its incredible turn-by-turn navigation feature. This app lets you know about the real-time traffic details. You can learn about the location, nearby petrol stations, restaurants by using it. This app also helps to share your location. As a result, your friends can track your location by using the Google Maps application.

2. Google Maps can track the history of the location

Google tracks the entire location history of the users. You can see your daily activities and visited places using this app like driving, walking, visiting a market, etc. Besides, it also enables you to explore different bodies in the solar system. Recently, the app also allows viewing the images of the Moon and Mars.

3. Google Earth assists in exploring

This apps allows the users to get a satellite view. But if you are willing to get the details of the things, you should use Google Earth. These satellite images of the Earth app have high resolution compared to the other one. You can explore the topography of any area and size of any building by using satellite data. It can guide you with fly-by tours of specific buildings and full cities. Besides, you can get details here more than the Wikipedia information. However, it doesn’t offer you the detailed data experience that you can get from Google maps.

This app also offers images of Street View. You can assume this app as a part of Google maps. Recently, Google released the Earth’s v9. since the last two years, developers have been working on it. Now, this app comes with a new feature called Knowledge Cards. When you tap on a card, you can see a page describing more details about the place.

However, for the zooming purpose of any location, you should not use the Earth app. This app comes with a new feature that we know as Voyager. With this new feature’s help, the app can allow the users to take virtual tours by including hand-picked places in the map-based stories formation. You can get high-quality landscape pictures of any area with the help of this new feature.

4. Google Earth contains the “I’m Feeling Lucky” button

In the latest version of this Google app, you can see the “I’m Feeling Lucky” button. It is available on Google Search. When you tap on the button, it takes you to any place in the world. It can track the user location with the help of a GPS chip and IP address. But the disadvantage is that it cannot save the record of those places that you visit. And it can’t give high-resolution images. Google Maps can provide about 95 % of that information that most users want to get in any mapping app. However, you can get the most details by using Google Earth.

Which is Best?

We know that Google Earth is mainly for the explorers, whereas Google map is for those who want to use it daily. Google Earth can enable you to travel to various locations, virtually in 3D.

Google Maps are helpful for daily users. As per the the online sources, most people prefer to choose the Google Map app to find out the right direction of any place. They also said that it is an app that can give you up-to-date information. From walking, biking to driving, Google Maps cover all updated details for turn-by-turn navigation.

Conclusion:

We hope, after checking this article based on Google Earth vs Google maps, you can understand the major difference between these two apps.

read more
1 5 6 7 8 9 20
Page 7 of 20